CS189 Assignment 4#
项目描述#
从这个项目起基本上告别小打小闹了, 我们要用PyTorch来搭建一些较为复杂的模型, 比如说CNN, Transformer, Bert. 关于PyTorch的API用法我不会做太多解释, 和CS336笔记中一样, 我会着重说明这些线性变换的尺寸和方式, 我觉得这才是真正理解模型的重要点
学习目标如下:
— 用PyTorch搭建自己的神经网络 — 理解并实现自定义的Datasets, DataLoaders和训练循环 — 学习如何复现论文中的模型架构 — 理解ResNet架构 — 用PyTorch实现Transformer — 理解Transformer的原理
Problem 1a#
用PyTorch写一个CNN类, 非常简单, 只要照着他给出的卷积核的尺寸往里填就行了
class CNN(nn.Module):
    def __init__(self, num_classes):
        super().__init__()
        # TODO: Instantiate the layers your CNN will have!
        self.conv1 = nn.Conv2d(in_channels=3, out_channels=16, kernel_size=3, stride=2, padding=1)
        self.conv2 = nn.Conv2d(in_channels=16, out_channels=16, kernel_size=7, stride=2, padding=1)
        self.linear = nn.Linear(in_features=16*54*54, out_features=num_classes)
        # Optional: You can also define your ReLU layers here if you'd like
        # Otherwise, if you decide to use F.relu you can just remove these lines
        self.relu1 = nn.ReLU()
        self.relu2 = nn.ReLU()

    def forward(self, x):
        # TODO: 1. Pass the input through the first conv layer
        conv1_out = self.conv1(x)

        # TODO: 2. Apply ReLU
        relu1_out = self.relu1(conv1_out)

        # TODO: 3. Pass to the 2nd conv layer
        conv2_out = self.conv2(relu1_out)

        # TODO: 4. Apply ReLU
        relu2_out = self.relu2(conv2_out)

        # TODO: 5. Flatten before linear layer
        flat = relu2_out.view(relu2_out.size(0), -1)

        # TODO: 6. Pass to linear layer
        out = self.linear(flat)

return out假设我们传入的尺寸为(1, 224 ,224 ,3), 具体含义是一个batch有一张图片, 一个图片有三个图层(channel), 图片的长和宽都是224, 不过我觉得没有必要对高维张量去进行具体的想象什么维度代表什么, 因为超过三维的东西就很难想得明白, 只要记住这个二维卷积核肯定是对倒数第一和第二的维度做变换就行了
conv1上的尺寸变换#
conv1的尺寸为:
self.conv1 = nn.Conv2d(in_channels=3, out_channels=16, kernel_size=3, stride=2, padding=1)先考虑对最后两维的变化, 卷积核的尺寸为3, 步长为2, 填充为1, 所以输出尺寸为:
Gauss((224 + 1 * 2 - 3) / 2 + 1) = 112其中Gauss()是向下取整函数, 又因为卷积核指定了out_channels = 16, 所以输出尺寸为(1, 16, 112, 112)
再解释一下这个输出通道的变化, 如图所示:
输入图片(3个图层)           每个输出通道的卷积核
┌─────────────┐
│   224 * 224   │ ──▶ 3 * 3 矩阵(处理R层)──┐
│   (R通道)   │                         │
├─────────────┤                         │
│   224 * 224   │ ──▶ 3 * 3 矩阵(处理G))──┼──▶ 求和 ──▶ 输出1个通道
│   (G通道)   │                         │
├─────────────┤                         │
│   224 * 224   │ ──▶ 3 * 3 矩阵(处理B层)──┘
│   (B通道)   │
└─────────────┘对于每个输出通道(1/16), 都有3个3*3的卷积核, 每个卷积核去处理输入当中的一个通道, 所以总共有16 * 3个卷积核, 每个的尺寸是3 * 3
也就是说, 输出通道变多的意思是我们有很多的卷积核分别在原图的不同层次上学习特征, 并且每次只输出一个通道
conv2上的尺寸变换#
conv2的尺寸为:
self.conv2 = nn.Conv2d(in_channels=16, out_channels=16, kernel_size=7, stride=2, padding=1)先考虑对最后两维的变化, 卷积核的尺寸为7, 步长为2, 填充为1, 所以输出尺寸为:
Gauss((112 + 1 * 2 - 7) / 2 + 1) = 54所以输出尺寸为(1, 16, 54, 54)
Linear上的尺寸变换#
linear的尺寸为:
self.linear = nn.Linear(in_features=16*54*54, out_features=num_classes)输入尺寸为(1, 16, 54, 54), 所以输出尺寸为(1, num_classes)
这里其实有两个步骤, 首先去做一个flatten操作, 把(1, 16, 54, 54)变成(1, 16 * 54 * 54), 然后再去做一个线性变换, 把(1, 16 * 54 * 54)变成(1, num_classes), 注意这一步总是可行的, 因为一个高维的东西总是可以把他的每个元素拿出来然后flatten到一维
检查输出尺寸#
运行他的检查代码, 确保我们的实现是正确的
x = torch.rand((1, 3, 224, 224))  # 1 image, 3 RGB channels, 224 x 224 pixels
print(f"Shape of input: {x.shape}")

res = CNN(num_classes=10)
out = res(x)
print(f"Shape of output: {out.shape}")
assert out.shape == torch.Size([1, 10]), f"Expected output shape (1, 10), but got {out.shape}"Shape of input: torch.Size([1, 3, 224, 224])
Shape of output: torch.Size([1, 10])理解HF Dataset对象#
很多时候要用HuggingFace的load_dataset来加载数据集, 所以有必要看一下加载的数据集对象的数据结构, 运行示例代码即可
All classes in the ImageNet dataset: {0: 'house_finch', 1: 'robin', 2: 'triceratops', 3: 'green_mamba', 4: 'harvestman', 5: 'toucan', 6: 'goose', 7: 'jellyfish', 8: 'nematode', 9: 'king_crab', 10: 'dugong', 11: 'Walker_hound', 12: 'Ibizan_hound', 13: 'Saluki', 14: 'golden_retriever', 15: 'Gordon_setter', 16: 'komondor', 17: 'boxer', 18: 'Tibetan_mastiff', 19: 'French_bulldog', 20: 'malamute', 21: 'dalmatian', 22: 'Newfoundland', 23: 'miniature_poodle', 24: 'white_wolf', 25: 'African_hunting_dog', 26: 'Arctic_fox', 27: 'lion', 28: 'meerkat', 29: 'ladybug', 30: 'rhinoceros_beetle', 31: 'ant', 32: 'black-footed_ferret', 33: 'three-toed_sloth', 34: 'rock_beauty', 35: 'aircraft_carrier', 36: 'ashcan', 37: 'barrel', 38: 'beer_bottle', 39: 'bookshop', 40: 'cannon', 41: 'carousel', 42: 'carton', 43: 'catamaran', 44: 'chime', 45: 'clog', 46: 'cocktail_shaker', 47: 'combination_lock', 48: 'crate', 49: 'cuirass', 50: 'dishrag', 51: 'dome', 52: 'electric_guitar', 53: 'file', 54: 'fire_screen', 55: 'frying_pan', 56: 'garbage_truck', 57: 'hair_slide', 58: 'holster', 59: 'horizontal_bar', 60: 'hourglass', 61: 'iPod', 62: 'lipstick', 63: 'miniskirt', 64: 'missile', 65: 'mixing_bowl', 66: 'oboe', 67: 'organ', 68: 'parallel_bars', 69: 'pencil_box', 70: 'photocopier', 71: 'poncho', 72: 'prayer_rug', 73: 'reel', 74: 'school_bus', 75: 'scoreboard', 76: 'slot', 77: 'snorkel', 78: 'solar_dish', 79: 'spider_web', 80: 'stage', 81: 'tank', 82: 'theater_curtain', 83: 'tile_roof', 84: 'tobacco_shop', 85: 'unicycle', 86: 'upright', 87: 'vase', 88: 'wok', 89: 'worm_fence', 90: 'yawl', 91: 'street_sign', 92: 'consomme', 93: 'trifle', 94: 'hotdog', 95: 'orange', 96: 'cliff', 97: 'coral_reef', 98: 'bolete', 99: 'ear'}
Dataset({
features: ['image', 'label'],
num_rows: 1000
})
Dataset({
features: ['image', 'label'],
num_rows: 200
})注意到他是个嵌套的数据结构
Problem 1b#
对于得到的数据集, 我们总是希望把它写成一个PyTorch的Dataset类的子类, 好处在于可以传递给DataLoader类, 各种操作都很方便, 而且:
— 可以做批次, 打乱顺序以及并行加载 — 将数据的预处理写成标准代码, 可读性好
总之就是比自己写一个类好得多
要完成这一点我们至少要继承torch.utils.data.Dataset类并且实现以下三个方法:
class myDataset(Dataset):
def __init__(self, ...):
raise NotImplementedError
# save data
# initialize preprocessing
# set up configurations
def __len__(self):
raise NotImplementedError
# return total number(rows) of dataset
def __getitem__(self, idx):
raise NotImplementedError
# return a single data and its label from dataset
# preprocessing will also be done here__init__和__len__比较容易实现, 讲一下__getitem__, 先分析一下数据结构和他的Hints:
之前拿到的Dataset嵌套结构是:
Dataset({
features: ['image', 'label'],
num_rows: 1000
})
Dataset({
features: ['image', 'label'],
num_rows: 200
})如果想获得一个image和label, 应该要:
# 在__getitem__里面
# 假设self.dataset已经初始化完毕
sample = self.dataset[idx]
img = sample['image']
label = sample['label']接下来要分出RGB channel, 按照Hint里面要对image用convert方法
img = img.convert("RGB")查了一下API, 这个image是PIL Image对象, 有一个convert方法转化出指定的颜色模式
接下来还需要实现一个show_images方法来画图, 这个就没什么多说的, 也就是通过类别找到图像, 切割出一些index去plot
完整代码如下:
class MiniImageNetDataset(Dataset):
def __init__(
self,
dataset,
class_id_to_name: dict[int, str],
split: str = "train",
transform: transforms.Compose = None,
):
"""
Args:
dataset (datasets.Dataset): HuggingFace dataset object
Each sample in the dataset has:
- An "image" field that contains the image data
- A "label" field that contains the numeric class ID
class_id_to_name (dict): dictionary mapping numeric class IDs to class names
split (str): "train" or "val" or "test"
"""
# TODO: Implement the __init__ method of the MiniImageNetDataset
self.split = split
self.dataset = dataset
self.transform = transform
self.class_id_to_name = class_id_to_name
def __len__(self):
# TODO: Implement the __len__ method of the MiniImageNetDataset
return len(self.dataset)
def __getitem__(self, index):
"""
Returns a single sample from the dataset at the given index.
Args:
index (int): index of the item to get
Returns:
tuple: (image, label) where image is a tensor of shape C x H x W and label is a tensor of shape 1
"""
# TODO: Implement the __getitem__ method of the MiniImageNetDataset
# Don't forget to...
# - Cast the item and label to torch.Tensor with the correct dtype
# - Permute the image into the shape (C, H, W)
# - Apply the transform if it's not None
sample = self.dataset[index]
img = sample['image']
label = sample['label']
img = img.convert("RGB")
if self.transform is not None:
img=self.transform(img)
label = torch.tensor(label,dtype=torch.long)
return img, label
def show_images(self, num_images: int = 10):
"""
Visualize images in a grid layout.
Args:
num_images (int): Number of images to display per class
Returns:
tuple: (fig, ax) - Matplotlib figure and axes objects
"""
# TODO: Implement the show_images method
# Make sure to call fig.show() or plt.show() to display your grid of images at the end!
# 所有类别 ID,按从小到大排序,方便排版
class_ids = sorted(self.class_id_to_name.keys())
n_classes = len(class_ids)
# 创建子图:每一行一个类别,每行 num_images 张图
fig, axes = plt.subplots(n_classes, num_images, figsize=(num_images * 2, n_classes * 2))
# 当只有 1 行或 1 列时,axes 不是二维数组,做个统一处理
if n_classes == 1:
axes = [axes]
if num_images == 1:
axes = [[ax] for ax in axes]
# 对每个类别画图
for row, cls in enumerate(class_ids):
# 找到属于该类别的样本下标
idxs = [i for i, y in enumerate(self.dataset["label"]) if y == cls]
# 只取前 num_images 个
idxs = idxs[:num_images]
for col, idx in enumerate(idxs):
img = self.dataset[idx]["image"] # 通常是 PIL.Image
ax = axes[row][col]
ax.imshow(img)
ax.axis("off")
# 每一行第一个子图上写类别名字
if col == 0:
ax.set_title(self.class_id_to_name[cls])
plt.tight_layout()
plt.show() # 或 fig.show()
return fig, axesProblem 1c#
先来看看如何构造数据的变换, 这里利用的是:
import torchvision.transforms as transforms从这里(https://docs.pytorch.org/vision/0.8/transforms.html ↗) 可以查到各种变换的用法, 题目里直接用他给的就行了, 为了把好几个变换做成变换序列, 需要用transforms.Compose, 或者(按文档中的说法)用torch.nn.Sequential也可以
train_transform = transforms.Compose([
transforms.Resize(256), # Resize the shorter side to 256
transforms.RandomCrop(224), # Random crop into shape 224×224
transforms.RandomHorizontalFlip(), # Random horizontal flip
transforms.ToTensor(), # Convert to tensor, scale to [0,1], and permute into shape (C, H, W)
transforms.Normalize(mean=[0.485, 0.456, 0.406],
std=[0.229, 0.224, 0.225]) # Normalize
])
val_transform = transforms.Compose([
transforms.Resize(256),
transforms.CenterCrop(224),
transforms.ToTensor(),
transforms.Normalize(mean=[0.485, 0.456, 0.406],
std=[0.229, 0.224, 0.225])
])
train_dataset = MiniImageNetDataset(mini_imagenet_train, class_id_to_name, split="train", transform=train_transform)
val_dataset = MiniImageNetDataset(mini_imagenet_val, class_id_to_name, split="val", transform=val_transform)从最后两行可以看出, 用这种继承Dataset的方式构造数据集很方便, 构造完毕后写成一个DataLoader也仅需一行代码
train_dataloader = DataLoader(train_dataset,batch_size=32,shuffle=True)
val_dataloader = DataLoader(val_dataset,batch_size=32,shuffle=True)
# Print the first batch of data and labels
for batch in train_dataloader: # each batch is a tuple of (data, labels)
data = batch[0] # data is a tensor of shape (B, 3, 224, 224)
labels = batch[1] # labels is a tensor of shape (B,)
print(f"Shape of data: {data.shape}")
print(f"Shape of labels: {labels.shape}")
break现在我们就可以通过循环去访问train_dataloader里面的batch, 再通过下标去访问数据和标签了
Problem 1d#
实现CNN的训练
训练循环的抽象#
理论上所有训练循环的抽象代码都差不多, 示例如下:
Step1: 把模型转移到device上(cpu/gpu)
model.to(device)Step2: 决定num_epochs并启动外层循环, 决定要遍历数据集多少次
for epoch in range(num_epochs):
# training logicStep3: 外层循环内每次都要把model设置为train模式
model.train()Step4: 启动内层循环, 遍历数据集的x和y, 这个内层循环一次处理一个batch
for x, y in train_dataloader:
x = x.to(device, dtype = torch.float)
y = y.to(device, dtype = torch.long)
Step5: 清零梯度
optimizer.zero_grad()Step6: 前向传播
y_hat = model(x)Step7: 计算损失
loss = criterion(y_hat, y)这里的criterion是预设的损失函数, 比如说nn.CrossEntropyLoss
Step8: 反向传播
loss.backward()Step9: 更新参数
optimizer.step()Step10: 记录损失
train_loss = loss.item()
preds = torch.argmax(y_hat, dim=1)
train_correct += (preds == y).sum().item()
Step11: 每个epoch结束之后计算`val_dataset`上的准确率, 这段代码是在内层循环外面的
```python
model.eval()
with torch.no_grad():
for x,y in val_dataloader:
x = x.to(device, dtype = torch.float)
y = y.to(device, dtype = torch.long)
y_hat = model(x)
loss = criterion(y_hat, y)
val_loss += loss.item()
preds = torch.argmax(y_hat, dim=1)
val_correct += (preds == y).sum().item()
val_loss /= len(val_dataloader)完整的抽象代码如下:
# === SETUP ===
model.to(device)
# === EPOCH LOOP ===
for epoch in range(num_epochs):
train_loss = 0.0
train_correct = 0.0
# === TRAINING PHASE ===
model.train() # Enable training mode
for x, y in train_dataloader:
# 1. Move data to device
x, y = x.to(device), y.to(device)
# 2. Reset gradients
optimizer.zero_grad()
# 3. Forward pass
y_hat = model(x)
# 4. Compute loss
loss = criterion(y_hat, y)
# 5. Backward pass (compute gradients)
loss.backward()
# 6. Update weights
optimizer.step()
# 7. Track metrics (optional)
# ...
# === VALIDATION PHASE ===
model.eval() # Disable training-specific layers
with torch.no_grad(): # Don't compute gradients
for x, y in val_dataloader:
# Forward pass only, no backward pass!
y_hat = model(x)
loss = criterion(y_hat, y)
# Track validation metrics
在一个epoch内, 可能会有很多batch, 每个batch我们会计算一次损失并且加入到train_loss里面, 直到这个epoch结束, 用train_loss/len(train_dataloader)就是平均损失, val_loss只在一个epoch结束之后算一次, 举例如下:
假设训练集有 1000 个样本, batch_size = 100, 那么每个 epoch 有 10 个 batch。在训练过程中, 每处理一个 batch, 我们计算一次该 batch 的 loss(比如分别是 0.85, 0.72, 0.68, …, 0.55), 并累加到 train_loss 中。Epoch 结束后,用 train_loss / len(train_dataloader) 得到平均训练损失(比如 6.5 / 10 = 0.65). 而 val_loss 只有在整个 epoch 的训练结束后才会计算, 它反映模型在验证集上的表现。
完整代码如下, 依葫芦画瓢即可:
# Common practice to check if GPU is available
if torch.accelerator.is_available():
device = torch.accelerator.current_accelerator()
else:
device = "cpu"
print(f"Using device: {device}")
assert str(device) in ["cuda", "mps"], "Please make sure you are using an accelerator (e.g. GPU or MPS)"
def train(
model, optimizer, criterion, num_epochs, train_dataloader, val_dataloader=None
):
"""
Args:
model: the model to train
optimizer: the optimizer to use
criterion: the loss function to use
num_epochs: the number of epochs to train for
train_dataloader: the dataloader for the training set
val_dataloader: the dataloader for the validation set
"""
# === SETUP ===
model.to(device)
# == (Optional) Perform a validation loop before training as a baseline ==
if val_dataloader:
model.eval() # Set model to evaluation mode
num_correct = 0.0
val_loss = 0.0
with torch.no_grad(): # Don't compute gradients
for x, y in val_dataloader:
x = x.to(device, dtype=torch.float)
y = y.to(device, dtype=torch.long)
y_hat = model(x)
loss = criterion(y_hat, y) # pred, target
val_loss += loss.item()
preds = torch.argmax(y_hat, dim=1)
num_correct += (preds == y).sum().item()
val_acc = num_correct / len(val_dataloader.dataset)
tqdm.write(f"Initial validation loss: {val_loss:.4f}")
tqdm.write(f"Initial validation accuracy: {val_acc:.4f}")
# Lists to store metrics across epochs
train_accuracies = []
train_losses = []
val_accuracies = []
val_losses = []
epoch_pbar = tqdm(range(num_epochs), desc="Training Progress", position=0)
# === EPOCH LOOP ===
for epoch in epoch_pbar:
# === TRAINING PHASE ===
model.train() # Set model to training mode
# Initialize metrics for this epoch
train_loss = 0.0
train_correct = 0.0
# === INNER LOOP (iterate over training batches) ===
for x, y in train_dataloader:
# 1. Move data to device
x = x.to(device, dtype=torch.float)
y = y.to(device, dtype=torch.long)
# 2. Reset gradients
optimizer.zero_grad()
# 3. Forward pass
y_hat = model(x)
# 4. Compute loss
loss = criterion(y_hat, y)
# 5. Backward pass (compute gradients)
loss.backward()
# 6. Update weights
optimizer.step()
# 7. Track metrics
train_loss += loss.item() # Accumulate loss (convert to Python float)
preds = torch.argmax(
y_hat, dim=1
) # Get predicted class for each item in the batch (highest prob = highest confidence)
train_correct += (preds == y).sum().item() # Count correct predictions
# === END OF INNER LOOP ===
# Compute average metrics for the epoch
avg_train_loss = train_loss / len(
train_dataloader
) # Average loss = total loss / total number of batches
train_acc = (
train_correct / len(train_dataloader.dataset)
) # Average accuracy = accuracy / total number of data points seen across the whole epoch (i.e. in the entire dataset)
train_losses.append(avg_train_loss)
train_accuracies.append(train_acc)
print(f"\nEpoch {epoch + 1} - Training accuracy: {train_acc:.3f}")
print(f"Epoch {epoch + 1} - Training loss: {train_loss:.3f}")
# === END OF TRAINING PHASE ===
# === VALIDATION PHASE ===
if val_dataloader:
model.eval() # Set model to evaluation mode
val_loss = 0.0
val_correct = 0.0
with torch.no_grad(): # Don't compute gradients
# === INNER LOOP (iterate over validation batches) ===
for x, y in val_dataloader:
# 1. Move data to device
x = x.to(device, dtype=torch.float)
y = y.to(device, dtype=torch.long)
# 2. Forward pass only, no backward pass!
y_hat = model(x)
# 3. Compute loss
loss = criterion(y_hat, y)
# 4. Track validation metrics
val_loss += loss.item()
preds = torch.argmax(y_hat, dim=1)
val_correct += (preds == y).sum().item()
# === END OF INNER LOOP ===
# Compute average metrics for the epoch
avg_val_loss = val_loss / len(val_dataloader)
val_acc = val_correct / len(val_dataloader.dataset)
val_losses.append(avg_val_loss)
val_accuracies.append(val_acc)
# === END OF VALIDATION PHASE ===
# === END OF EPOCH LOOP ===
# Print metrics for the epoch
print(f"Epoch {epoch + 1} - Validation accuracy: {val_acc:.3f}")
print(f"Epoch {epoch + 1} - Validation loss: {val_loss:.3f}")
epoch_pbar.set_postfix(
{
"train_loss": f"{train_loss:.3f}",
"train_acc": f"{train_acc:.3f}",
"val_loss": f"{val_loss:.3f}",
"val_acc": f"{val_acc:.3f}",
}
)
return train_accuracies, train_losses, val_accuracies, val_losses调用自定义的训练循环#
现在需要实现train函数里面的参数
实现模型实例:
cnn = CNN(num_classes=10)定义循环轮次:
num_epochs = 20定义优化器:
optimizer = AdamW(cnn.parameters(),lr=0.0005)定义损失函数:
criterion = torch.nn.CrossEntropyLoss()开始训练
cnn_train_accuracies, cnn_train_losses, cnn_val_accuracies, cnn_val_losses = train(
model=cnn,
optimizer=optimizer,
criterion=criterion,
num_epochs=num_epochs,
train_dataloader=train_dataloader,
val_dataloader=val_dataloader
)Initial validation loss: 16.1283
Initial validation accuracy: 0.1000
Training Progress: 0%| | 0/20 [00:00<?, ?it/s]
Epoch 1 - Training accuracy: 0.238
Epoch 1 - Training loss: 68.580
Training Progress: 5%|▌ | 1/20 [00:09<03:01, 9.53s/it, train_loss=68.580, train_acc=0.238, val_loss=14.099, val_acc=0.295]Epoch 1 - Validation accuracy: 0.295
Epoch 1 - Validation loss: 14.099
Epoch 20 - Training accuracy: 0.599
Epoch 20 - Training loss: 36.430
Training Progress: 100%|██████████| 20/20 [03:13<00:00, 9.67s/it, train_loss=36.430, train_acc=0.599, val_loss=11.613, val_acc=0.525]Epoch 20 - Validation accuracy: 0.525
Epoch 20 - Validation loss: 11.613Problem 1e#
写一个画图函数来画损失曲线和准确率曲线
def plot_metrics(train_losses, val_losses, train_accuracies=None, val_accuracies=None, num_epochs=None, title=""):
"""
Plots the training loss, training accuracy, validation loss, and validation accuracy.
Args:
train_losses: list of training losses
val_losses: list of validation losses
train_accuracies: list of training accuracies
val_accuracies: list of validation accuracies
num_epochs: number of epochs
title: title of the plot
"""
fig, axes = plt.subplots(2, 2, figsize=(12, 8))
# 训练损失
axes[0, 0].plot(train_losses, label='Training Loss')
axes[0, 0].set_title('Training Loss')
axes[0, 0].set_xlabel('Epoch')
axes[0, 0].set_ylabel('Loss')
axes[0, 1].plot(train_accuracies, label='Training Accuracy')
axes[0, 1].set_title('Training Accuracy')
axes[0, 1].set_xlabel('Epoch')
axes[0, 1].set_ylabel('Accuracy')
axes[1, 0].plot(val_losses, label='Validation Loss')
axes[1, 0].set_title('Validation Loss')
axes[1, 0].set_xlabel('Epoch')
axes[1, 0].set_ylabel('Loss')
axes[1, 1].plot(val_accuracies, label='Validation Accuracy')
axes[1, 1].set_title('Validation Accuracy')
axes[1, 1].set_xlabel('Epoch')
axes[1, 1].set_ylabel('Accuracy')
plt.tight_layout()
plt.suptitle(title)
plt.show()
plot_metrics(cnn_train_losses, cnn_val_losses, cnn_train_accuracies, cnn_val_accuracies, num_epochs=20, title="CNN Training Metrics")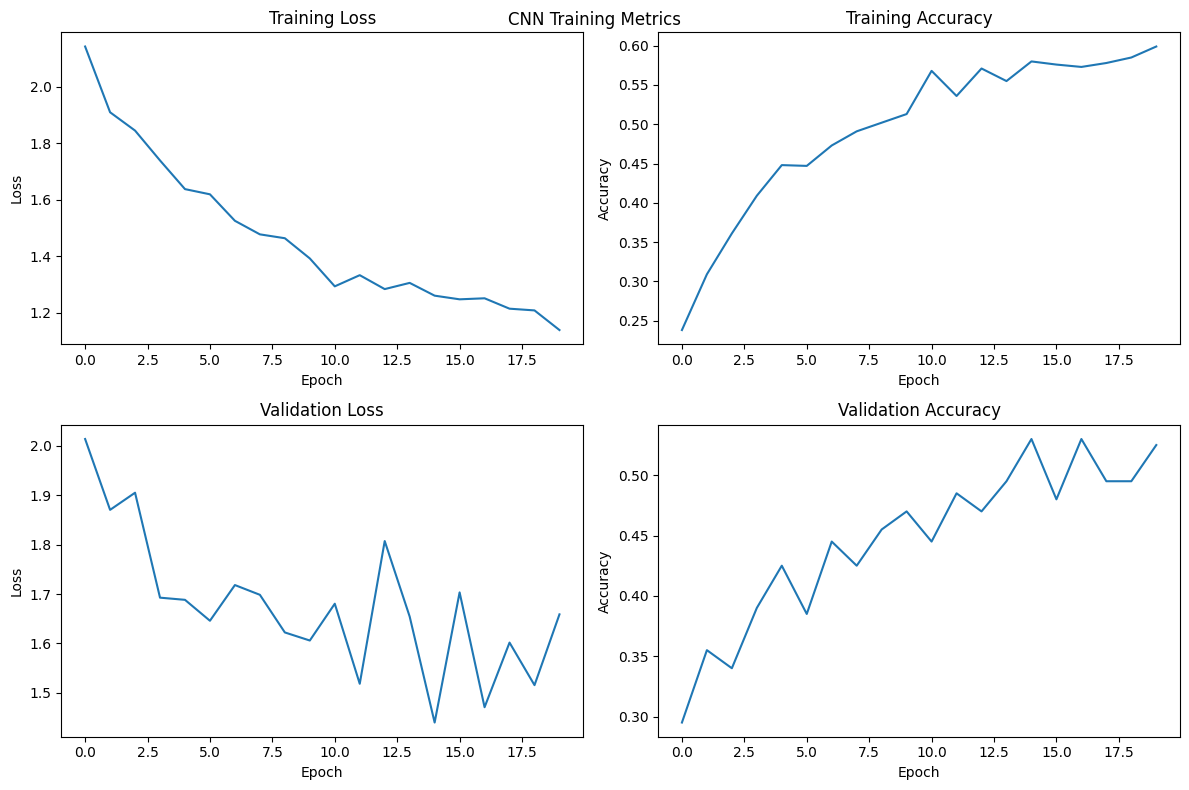
残差块#
如果我们的某一层神经网络需要学习的函数是f(x), 我们可以让他学习g(x) = f(x) - x, 然后在输出端再加上x即可(即输出f(x) = g(x) + x)
这有个显然的好处, 对于第一层的梯度:
最后一项的+1有效防止了梯度消失, 因为梯度为-1是不稳定的, 并不会一直出现, 所以可以保证梯度不会指数级别的衰减到0, 不过也许还是会震荡
Problem 2a#
根据给出的架构自己实现ResNet
输入 x (in_channels)
│
┌─────────────┴─────────────┐
│ │
▼ │
┌─────────┐ │
│ Conv1 │ ──→ BatchNorm1 ──→ ReLU
└────┬────┘ │
│ │
┌────┴────┐ │
│ Conv2 │ ──→ BatchNorm2 │
└────┬────┘ │
│ │
┌────┴────────────────────────────┐
│ + │ ← 残差相加
└────┬────────────────────────────┘
│
ReLU (out)卷积层在CNN的实现当中已经解释过了, 说一说归一化层nn.BatchNorm2d, 实际上对于输入维度[B, C, H, W], 他会对每个batch的每个channel(的所有数据点)去计算均值和方差做归一化
# 输入: conv_output shape = [B=4, C=3, H=2, W=2]
# B=batch size, C=channels, H=height, W=width
x = torch.tensor([
# batch 0
[[[1, 2], # channel 0
[3, 4]],
[[5, 6], # channel 1
[7, 8]],
[[9, 10], # channel 2
[11, 12]]],
# batch 1
[[[2, 3],
[4, 5]],
[[6, 7],
[8, 9]],
[[10, 11],
[12, 13]]],
# batch 2...
# batch 3...
])┌─────────────────────────────────────────────────────────────┐
│ BatchNorm2d 对每个通道独立计算: │
├─────────────────────────────────────────────────────────────┤
│ │
│ Channel 0 (所有batch): │
│ ┌─────────┬─────────┬─────────┬─────────┐ │
│ │ batch0 │ batch1 │ batch2 │ batch3 │ │
│ │ [[1,2], │ [[2,3], │ ... │ ... │ │
│ │ [3,4]] │ [4,5]] │ │ │ │
│ └─────────┴─────────┴─────────┴─────────┘ │
│ │ │ × 4 │
│ └───────────┴───────────────────────→ │
│ 展平成: [1,2,3,4, 2,3,4,5, ...] │
│ │
│ μ₀ = mean([1,2,3,4,2,3,4,5, ...]) │
│ σ₀² = var([1,2,3,4,2,3,4,5, ...]) │
│ │
├─────────────────────────────────────────────────────────────┤
│ │
│ Channel 1: │
│ ┌─────────┬─────────┬─────────┬─────────┐ │
│ │ [[5,6], │ [[6,7], │ ... │ ... │ │
│ │ [7,8]] │ [8,9]] │ │ │ │
│ └─────────┴─────────┴─────────┴─────────┘ │
│ │ │ × 4 │
│ └───────────┴───────────────────────→ │
│ 展平成: [5,6,7,8,6,7,8,9, ...] │
│ │
│ μ₁ = mean([5,6,7,8,6,7,8,9, ...]) │
│ σ₁² = var([5,6,7,8,6,7,8,9, ...]) │
│ │
├─────────────────────────────────────────────────────────────┤
│ │
│ Channel 2: 同理计算 μ₂, σ₂² │
│ │
└─────────────────────────────────────────────────────────────┘
结果:3个通道 → 3个均值(μ₀, μ₁, μ₂) + 3个方差(σ₀², σ₁², σ₂²)再说一下这里的残差连接, 当x经过主路径几个卷积层的变换后, 此时肯定是不能和原始输入x相加了, 所以需要一个1x1的卷积层来把x的通道数变成和主路径的输出通道数一样, 然后再相加
class ResidualBlock(nn.Module):
def __init__(
self,
in_channels=3,
out_channels=64,
kernel_size=3,
initial_downsample=False, # whether to downsample the input
verbose=False, # whether to print debug statements
):
super().__init__()
self.verbose = verbose
# TODO: Define the first conv layer
self.conv1 = nn.Conv2d(in_channels=in_channels, out_channels=out_channels,
kernel_size=kernel_size,padding=1,stride=1 if not initial_downsample else 2)
# TODO: Define the first batchnorm layer
self.batchnorm1 = nn.BatchNorm2d(num_features=out_channels)
# TODO: Define the second conv layer
self.conv2 = nn.Conv2d(in_channels=out_channels,out_channels=out_channels,kernel_size=kernel_size,
padding=1,stride=1)
# TODO: Define the second batchnorm layer
self.batchnorm2 = nn.BatchNorm2d(num_features=out_channels)
# TODO: Define the residual connection
self.residual_connection = nn.Conv2d(in_channels=in_channels,out_channels=out_channels,kernel_size=1,
stride=1 if not initial_downsample else 2)
def forward(self, x):
# TODO: Implement the forward pass
conv1 = self.conv1
if self.verbose:
print(f"conv1 shape: {conv1.shape}")
bn1 = self.batchnorm1
if self.verbose:
print(f"bn1 shape: {bn1.shape}")
relu=nn.ReLU()
z1 = relu(bn1(conv1(x)))
conv2 = self.conv2
if self.verbose:
print(f"conv2 shape: {conv2.shape}")
bn2 = self.batchnorm2
if self.verbose:
print(f"bn2 shape: {bn2.shape}")
residual = self.residual_connection
if self.verbose:
print(f"residual shape: {residual.shape}")
out = bn2(conv2(z1))+residual(x)
# Don't forget to apply ReLU activation after adding the residual
out = relu(out)
return out运行维度检查的代码:
x = torch.rand((1, 3, 224, 224)) # 1 image, 3 RGB channels, 224 x 224 pixels
print(f"Shape of input: {x.shape}")
res = ResidualBlock(in_channels=3, out_channels=64, kernel_size=3, initial_downsample=True, verbose=False)
resblock_out = res(x)
print(f"Shape of output: {resblock_out.shape}")
assert resblock_out.shape == torch.Size([1, 64, 112, 112]), f"Expected output shape (1, 64, 112, 112), but got {resblock_out.shape}"Shape of input: torch.Size([1, 3, 224, 224])
Shape of output: torch.Size([1, 64, 112, 112])# Verify the shapes of the weights
conv1_shape = res.conv1.weight.shape
print(f"Shape of conv1 weight: {conv1_shape}")
assert conv1_shape == torch.Size([64, 3, 3, 3]), f"Expected Conv1 weights to have shape (64, 3, 3, 3), but got {conv1_shape}"
conv2_shape = res.conv2.weight.shape
print(f"Shape of conv2 weight: {conv2_shape}")
assert conv2_shape == torch.Size([64, 64, 3, 3]), f"Expected Conv2 weights to have shape (64, 64, 3, 3), but got {conv2_shape}"
residual_shape = res.residual_connection.weight.shape
print(f"Shape of residual weight: {residual_shape}")
assert residual_shape == torch.Size([64, 3, 1, 1]), f"Expected residual connection to have shape (64, 3, 1, 1), but got {residual_shape}"Shape of conv1 weight: torch.Size([64, 3, 3, 3])
Shape of conv2 weight: torch.Size([64, 64, 3, 3])
Shape of residual weight: torch.Size([64, 3, 1, 1])Problem 2b#
刚刚我们已经实现了残差块, 得益于PyTorch的继承和封装机制, 我们可以很方便的再实现ResNet-18
class ResNet18(nn.Module):
def __init__(self, num_classes, verbose=False):
# TODO: Instantiate all the layers/stages of ResNet-18
# Hint: don't forget to call super().__init__() first!
super().__init__()
self.conv1=nn.Conv2d(in_channels=3,out_channels=64,kernel_size=7,stride=2,padding=3)
self.batchnorm1=nn.BatchNorm2d(num_features=64)
self.relu=nn.ReLU()
self.maxpool1=nn.MaxPool2d(kernel_size=3,stride=2,padding=1)
self.residualblock1=ResidualBlock(in_channels=64,out_channels=64,kernel_size=3)
self.residualblock2=ResidualBlock(in_channels=64,out_channels=64,kernel_size=3)
self.residualblock3=ResidualBlock(in_channels=64,out_channels=128,kernel_size=3,initial_downsample=True)
self.residualblock4=ResidualBlock(in_channels=128,out_channels=128,kernel_size=3)
self.residualblock5=ResidualBlock(in_channels=128,out_channels=256,kernel_size=3,initial_downsample=True)
self.residualblock6=ResidualBlock(in_channels=256,out_channels=256,kernel_size=3)
self.residualblock7=ResidualBlock(in_channels=256,out_channels=512,kernel_size=3,initial_downsample=True)
self.residualblock8=ResidualBlock(in_channels=512,out_channels=512,kernel_size=3)
self.avgpool=nn.AdaptiveAvgPool2d(output_size=(1,1))
self.flatten=nn.Flatten()
self.fc=nn.Linear(in_features=512,out_features=num_classes)
self.model=nn.Sequential(self.conv1,self.batchnorm1,self.relu,self.maxpool1,self.residualblock1,self.residualblock2,
self.residualblock3,self.residualblock4,self.residualblock5,self.residualblock6,
self.residualblock7,self.residualblock8,self.avgpool,self.flatten,self.fc)
def forward(self, x):
# TODO: Implement the forward pass of ResNet-18
out=self.model(x)
return out看起来很吓人, 不过是搭积木罢了
x = torch.rand((1, 3, 224, 224)) # 1 image, 3 RGB channels, 224 x 224 pixels
print(f"Shape of input: {x.shape}")
resnet18 = ResNet18(num_classes=10, verbose=True)
resnet18_out = resnet18(x)
print(f"Shape of output: {resnet18_out.shape}")
assert resnet18_out.shape == torch.Size([1, 10]), f"Expected output shape (1, 10), but got {resnet18_out.shape}"
Shape of input: torch.Size([1, 3, 224, 224])
Shape of output: torch.Size([1, 10])Problem 2c#
直接调用之前的train函数开始训练即可
# TODO: Instantiate a ResNet18 model
resnet = ResNet18(num_classes=10)

# TODO: Set the number of epochs
num_epochs = 50

# TODO: Instantiate an optimizer
optimizer = AdamW(resnet.parameters(),lr=0.001)

# TODO: Instantiate a loss criterion
criterion = nn.CrossEntropyLoss()

# TODO: Train the model

resnet_train_accuracies, resnet_train_losses, resnet_val_accuracies, resnet_val_losses = train(
    model=resnet,
    optimizer=optimizer,
    criterion=criterion,
    num_epochs=num_epochs,
    train_dataloader=train_dataloader,
    val_dataloader=val_dataloader
)Problem 2d#
同样的, 调用plot_metrics函数画出损失曲线
plot_metrics(resnet_train_losses, resnet_val_losses, resnet_train_accuracies, resnet_val_accuracies, num_epochs=50, title="ResNet Training Metrics")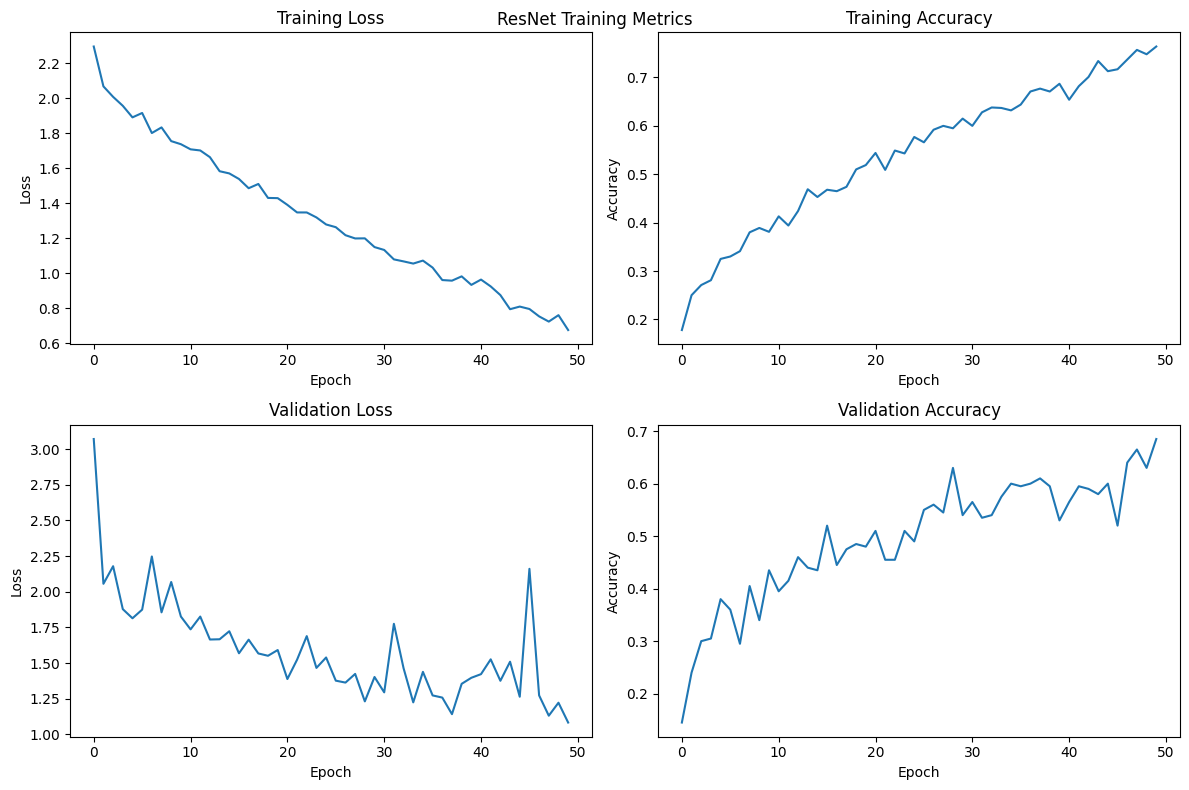
Transformer#
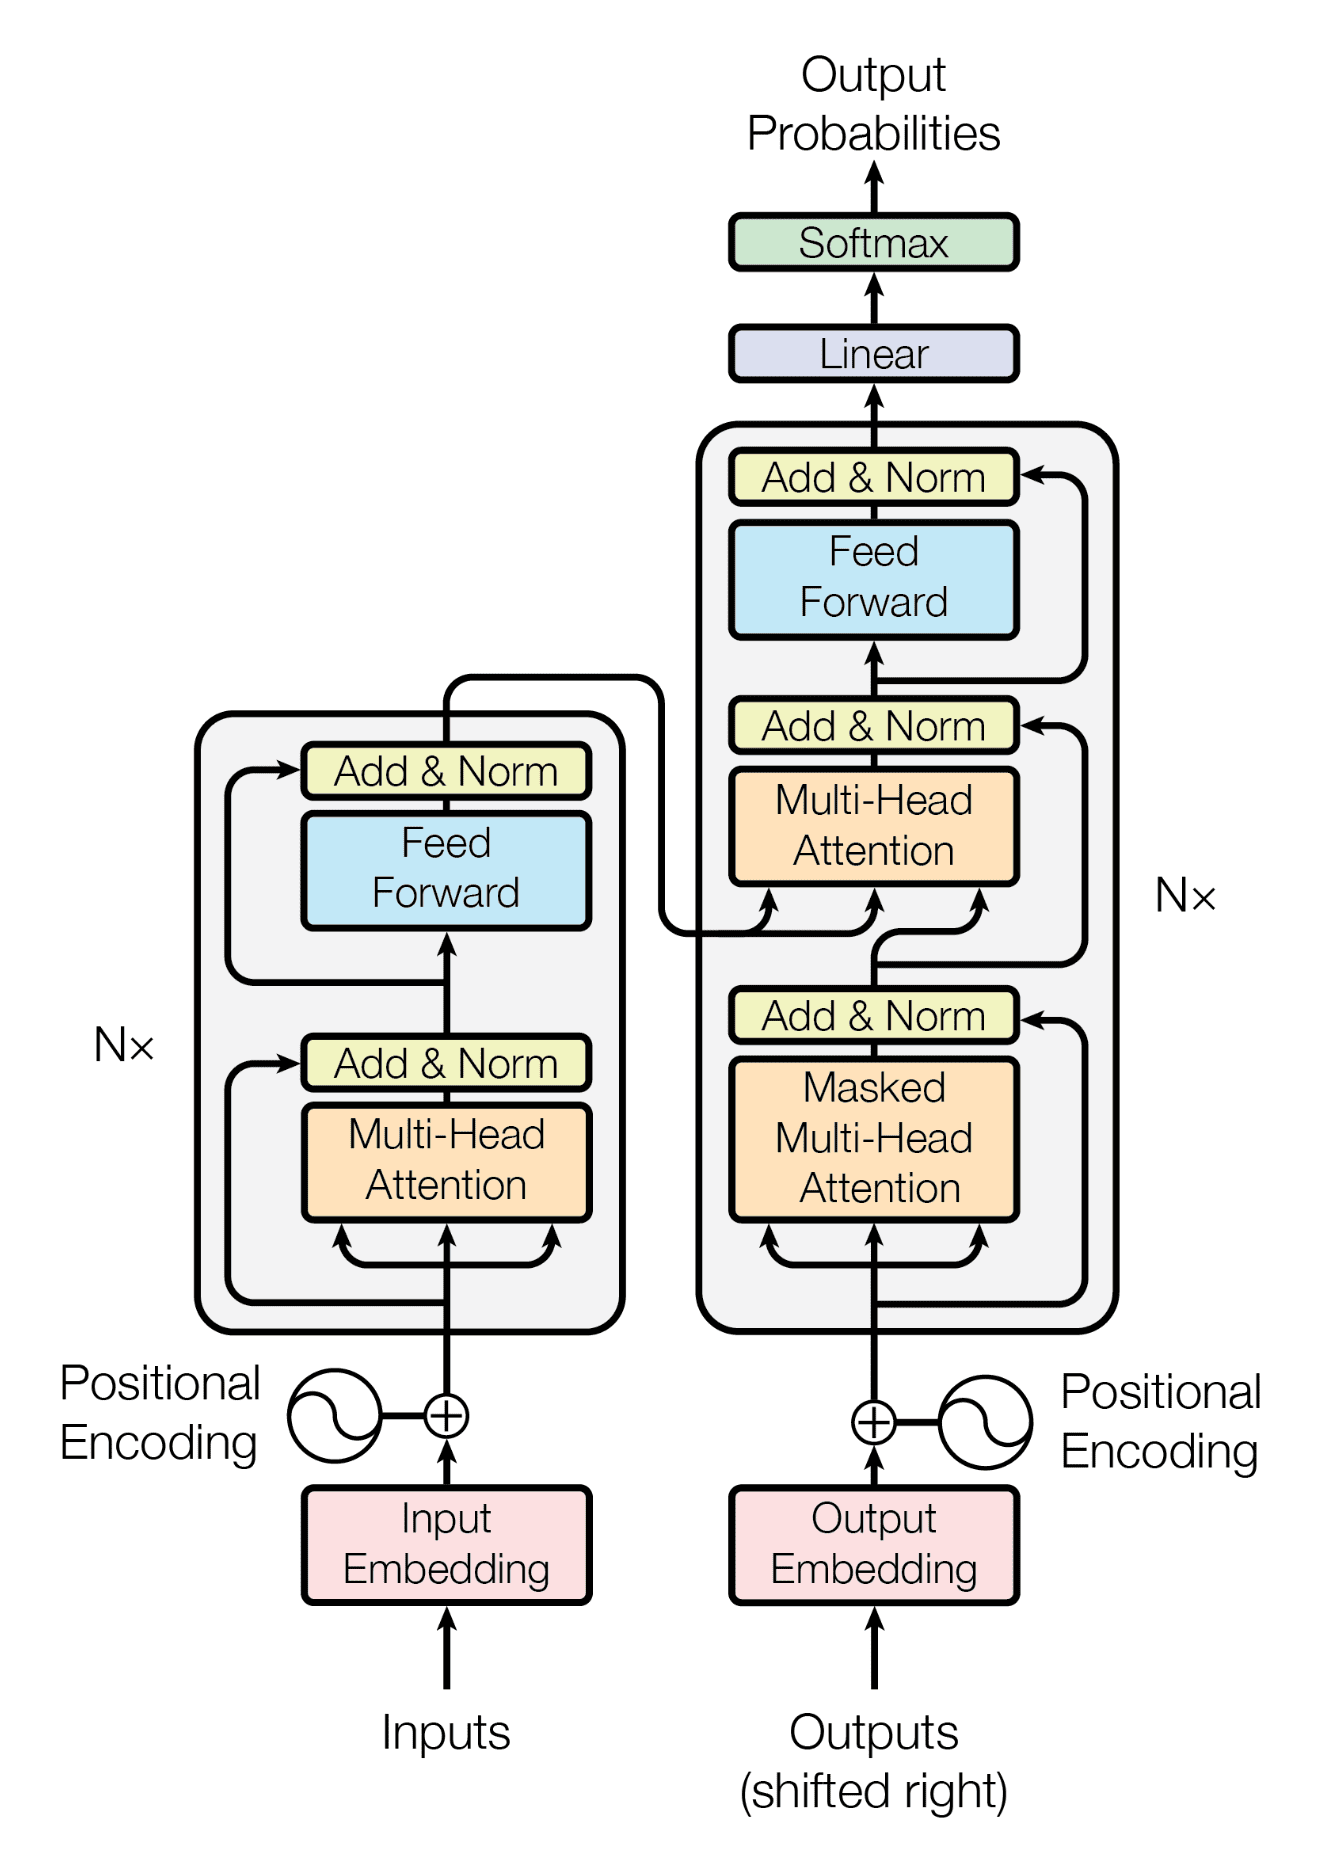
这里要求我们实现Transformer模型, 虽然说这个完整的架构比CS336里面那个要实现的东西多一点, 但实际上简单很多, 因为这里全程都用PyTorch实现, 而那边基本上都是手搓
和之前做ResNet一样, 先从子块开始实现, 然后再搭积木拼装回去
这一部分的更详细实现和原理参看我CS336的Assignment1 Part2的文章
Problem 3a#
要求实现softmax, 直接用torch.exp和torch.sum即可
def softmax(x: torch.Tensor):
    """
    Compute the softmax of each element in x.
    """
    x_exp=torch.exp(x)
    x_sum=torch.sum(x_exp,dim=-1,keepdim=True)
return x_exp/x_sumProblem 3b#
要求实现点积注意力机制, 本质上就是几个矩阵(Tensor)相乘而已
import math
def scaled_dot_product_attention(Q: torch.Tensor, K: torch.Tensor, V: torch.Tensor, mask=None, verbose=False):
    """
    Q: matrix of shape (B, N, d_k)
    K: matrix of shape (B, N, d_k)
    V: matrix of shape (B, N, d_v)
    mask: boolean matrix of shape (B, N, N). Values where mask is True will be masked out

    B is the batch size
    N is the number of query/key/value vectors
    d_k is the dimensions of the query/key vectors
    d_v is the dimensions of the value vectors
    """
    assert Q.shape[-1] == K.shape[-1], "Q and K must have same d_k dimension"
    assert K.shape[-2] == V.shape[-2], "K and V must have same sequence length"


    # TODO: Implement the attention function
return torch.matmul((softmax(torch.matmul(Q,K.transpose(-2,-1))/math.sqrt(Q.shape[-1]))),V)Problem 3c#
要求实现注意力头, 注意这里的输入有两种, 一种是输入x, 然后通过三个变换矩阵分别变换到, 另一种是在Outputs模块当中, 左边的两个输入要读取Inputs模块的输出, 右边的一个输入为x, 通过一个verbose参数去控制一下就好了
class AttentionHead(nn.Module):
    def __init__(self, d_model=512, d_k=64, verbose=False):

        # TODO: Implement the __init__ method
        # Don't forget to call super().__init__()!
        super().__init__()
        self.W_q=nn.Linear(d_model,d_k)
        self.W_k=nn.Linear(d_model,d_k)
        self.W_v=nn.Linear(d_model,d_k)
        self.verbose=verbose


    def forward(self, x, encoder_output=None, mask=None):
        """
        x is the input to use for the queries, keys, and values
        encoder_output is the output from the encoder (used for cross-attention)
        mask is the mask to use for the attention
        """


        # TODO: Implement the forward method
        Q = self.W_q(x)
        K = self.W_k(x)
        V = self.W_v(x)

        if encoder_output is not None:
            Q = self.W_q(x)
            K = self.W_k(encoder_output)
            V = self.W_v(encoder_output)

        out = scaled_dot_product_attention(Q,K,V,mask=mask,verbose=self.verbose)

return out所谓的”三个线性变换到QKV空间”其实就是三个线性层
Problem 3d#
要求实现多头机制, 其实只不过是初始化若干个AttentionHead类, 然后把x传入每个类, 最后把每个类的输出拼接起来, 这里只要注意一下每个头的维度均为d_k = d_model / num_heads即可, 还有就是计算完的注意力要乘以一个W_o矩阵
class MultiHeadAttention(nn.Module):
    def __init__(
        self,
        num_heads=8,
        d_model=512,  # dimension of the embeddings
        verbose=False,
    ):
        """
        Args:
            num_heads: number of attention heads
            d_model: dimension of the embeddings
            verbose: whether to print debug information
        """

        # TODO: Implement the __init__ method
        super().__init__()
        self.d_k = d_model//num_heads
        self.heads = nn.ModuleList([AttentionHead(d_model=d_model,d_k=self.d_k,verbose=verbose) for _ in range(num_heads)])
        self.W_out = nn.Linear(d_model,d_model)

    def forward(self, x, encoder_output=None, mask=None):

        # TODO: Implement the forward method
        out = torch.cat([head(x,encoder_output,mask)for head in self.heads],dim=-1)
        out = self.W_out(out)

        return out
Problem 3e#
实现架构图的左半部分, 非常纯粹的看图说话, 而且用torch实现这个ffn也非常简单, 不过是一个线性层加上一个ReLU而已
如果想看LayerNorm, Linear, ReLU的实现, 参看我CS336的Assignment1 Part2的文章
class EncoderLayer(nn.Module):
    def __init__(self, d_model=512, num_heads=8, verbose=False):

        # TODO: Implement the __init__ method
        super().__init__()
        self.multiheadlayer=MultiHeadAttention(num_heads=num_heads,d_model=d_model,verbose=verbose)
        self.layer_norm1=nn.LayerNorm(d_model)
        self.ffn=nn.Sequential(
            nn.Linear(d_model,d_model),
            nn.ReLU(),

        )

    def forward(self, x, mask=None):

        # TODO: Implement the forward method
        # 1. Self-attention
        out = self.multiheadlayer(x,mask=mask)
        # 2. Residual connection
        out = x + out
        # 3. LayerNorm
        out = self.layer_norm1(out)
        norm1_out = out
        # 4. Feedforward network
        out=self.ffn(out)
        # 5. Residual connection
        out=out+norm1_out
        # 6. LayerNorm
        out=self.layer_norm1(out)
        # 7. Return the output
return outProblem 3f#
实现架构图的右半部分Decoder, 和上面差不多, 不再赘述了, 这里我没有写mask功能, 实际上mask功能就是构造一个上三角为True, 下三角为False的矩阵, 然后让注意力机制在计算注意力的时候, 把下三角的注意力权重设为负无穷, 这样在计算注意力权重的时候, 下三角的注意力权重就会变成0, 从而实现mask功能
具体可以看我CS336的Assignment1 Part2的文章, 那里非常详细的说了这个掩码功能
class DecoderLayer(nn.Module):
    def __init__(self, d_model=512, num_heads=8, verbose=False):

        # TODO: Implement the __init__ method
        super().__init__()
        self.masked_multiheadlayer1=MultiHeadAttention(num_heads=num_heads,d_model=d_model,verbose=verbose)
        self.layernorm1=nn.LayerNorm(d_model)
        self.masked_multiheadlayer2=MultiHeadAttention(num_heads=num_heads,d_model=d_model,verbose=verbose)
        self.ffn=nn.Sequential(
            nn.Linear(d_model,4*d_model),
            nn.ReLU(),
            nn.Linear(4*d_model,d_model)
        )
        self.layernorm2=nn.LayerNorm(d_model)

    def forward(self, x, encoder_output):

        # TODO: Implement the forward method
        mask = torch.triu(torch.ones(x.shape[1], x.shape[1], dtype=torch.bool, device=x.device), diagonal=1)
        # Create a look-ahead mask

        # 1. Masked self-attention
        out = self.masked_multiheadlayer1(x,mask=mask)
        # 2. Residual connection
        out = x + out
        # 3. LayerNorm
        out = self.layernorm1(out)
        norm1 = out
        # 4. Cross-attention
        out = self.masked_multiheadlayer2(out,encoder_output=encoder_output)
        # 5. Residual connection
        out = out + norm1
        # 6. LayerNorm
        out = self.layernorm2(out)
        norm2=out
        # 7. Position-wise feed forward network
        out = self.ffn(out)
        # 8. Residual connection
        out = out + norm2
        # 9. LayerNorm
        out = self.layernorm2(out)
        # 10. Return the final normalized output
        return out
# 10. Return the final normalized outputProblem 3g#
要求实现RoPE, 这里解释起来比较复杂, 建议看336的notes, 这里我直接给出代码
class PositionalEncoding(nn.Module):
    def __init__(self, d_model, max_len=1024):
        """
        max_len = max number of tokens in the sequence
        """
        super().__init__()
        self.pos = torch.zeros((max_len, d_model))
        numerator = torch.arange(end=max_len, dtype=torch.float32).reshape(-1, 1) # shape (seq_len, 1)
        denominator = torch.pow(10000, torch.arange(start=0, end=d_model, step=2, dtype=torch.float32) / d_model).reshape(1, -1) # shape (1, d_model / 2)

        quotient = numerator / denominator # shape (seq_len, d_model). quotient[i, j] = numerator[i, 0] / denominator[0, j]
        self.pos[:, 0::2] = torch.sin(quotient) # assign result of trig to all even indices for every token positions
        self.pos[:, 1::2] = torch.cos(quotient) # assign result of trig to all odd indices for every token position

    def forward(self, x):
        """
        Input x is of shape (B, seq_len, d_embedding)
        """
        out = x + self.pos[:x.shape[1], :].to(device=x.device)
return outProblem 3h#
拓展一下encode部分, 本质上encode就三件事情: 词嵌入, RoPE, 过含有多头注意力, layernorm, ffn的EncodeLayer
class TransformerEncoder(nn.Module):
    def __init__(
        self, vocab_size=1024, d_model=512, num_layers=6, num_heads=8, verbose=False
    ):

        # TODO: Implement the __init__ method
        super().__init__()
        self.embedding=nn.Embedding(num_embeddings=vocab_size,embedding_dim=d_model)
        self.positional_encoding=PositionalEncoding(d_model=d_model)
        self.encoder_layers=nn.ModuleList([EncoderLayer(d_model=d_model,num_heads=num_heads,verbose=verbose) for _ in range(num_layers)])
        self.num_layers=num_layers
        self.num_heads=num_heads

    def forward(self, x):

        # 1. Embed the input sequence of tokens
        x = self.embedding(x)
        # 2. Add positional encodings
        x = self.positional_encoding(x)
        # 3. Sequentially pass the result through each EncoderLayer
        for layer in self.encoder_layers:
            x = layer(x)
        # 4. Return the final tensor
return xProblem 3i#
拓展decode部分, 和上面一样
class TransformerDecoder(nn.Module):
    def __init__(self, vocab_size=1024, d_model=512, num_layers=6, num_heads=8, verbose=False):

        # TODO: Implement the __init__ method
        super().__init__()
        self.embedding=nn.Embedding(num_embeddings=vocab_size,embedding_dim=d_model)
        self.positional_encoding=PositionalEncoding(d_model=d_model)
        self.num_layers=num_layers
        self.decoder_layers=nn.ModuleList([DecoderLayer(d_model=d_model,num_heads=num_heads,verbose=verbose) for _ in range(num_layers)])
        self.linear=nn.Linear(d_model,vocab_size)

    def forward(self, x, encoder_output):

        # 1. Embed the input sequence of tokens
        x = self.embedding(x)

        # 2. Add positional encodings
        x = self.positional_encoding(x)

        # 3. Sequentially pass the result through each DecoderLayer
        for layer in self.decoder_layers:
            x = layer(x,encoder_output)

        # 4. Apply the linear layer to predict the next token in our vocabulary
        x = self.linear(x)

        # 5. Return the final tensor
return xProblem 3j#
全部组装成Transformer类即可
class Transformer(nn.Module):
    def __init__(
        self,
        vocab_size=1024,
        d_model=512,
        num_encoder_layers=6,
        num_decoder_layers=6,
        num_heads=8,
        verbose=False,
    ):

        # TODO: Implement the __init__ method
        super().__init__()
        self.encoder=TransformerEncoder(vocab_size=vocab_size,d_model=d_model,num_layers=num_encoder_layers,num_heads=num_heads,verbose=verbose)
        self.decoder=TransformerDecoder(vocab_size=vocab_size,d_model=d_model,num_layers=num_decoder_layers,num_heads=num_heads,verbose=verbose)

    def forward(self, x):

        # TODO: Implement the forward method
        # 1. Pass `x` through the encoder
        encoder_output = self.encoder(x)
        # 2. Pass `x` and the encoder's output through the decoder
        x = self.decoder(x,encoder_output)
        # 3. Return the output of the decoder
return x接下来是”鉴赏”部分, 课程组帮我们准备好了TinyStories数据集并且做好了分词, 只不过这是个word级别的分词, 而我们在336里面实现的是byte级的
Problem 3k#
题目让我们处理一下段落, 其实也就是完成以下任务:
— 按换行把段落分开
— 每一段用之前给出的extract_full_words得到一个词列表
— 在段落的开头和结尾加上<start>和<end>
— 对于段落中的每个词, 用word_to_id得到一个ID(毕竟输入模型的不能是词语)
— 跳过每个比max_seq_length还短的段落 (这里不知道是不是课程组笔误了, 应该记作min_seq_length才对)
— 用滑动窗口得到inputs和targets, 保证targets永远比inputs长1(预测下一个token)
def create_sequences(stories, word_to_id, max_seq_length=20, pad_token=PAD_TOKEN, start_token=START_TOKEN, end_token=END_TOKEN):
    """
    Create input/target sequences from paragraphs

    Args:
        stories (list): List of stories to create sequences from
        word_to_id (dict): Dictionary mapping words to their token IDs
        max_seq_length (int): Maximum sequence length to create
        pad_token (str): Token for the pad token
        start_token (str): Token for the start of a sequence
        end_token (str): Token for the end of a sequence

    Returns:
        inputs (tensor): Tensor of input sequences
        targets (tensor): Tensor of target sequences
    """
    inputs = []
    targets = []

    # List of paragraphs
    paragraphs = []

    # TODO: Split the stories into paragraphs and append them to the `paragraphs` list
    for story in stories:
        story_paragraphs = story.split("\n\n")
        paragraphs.extend(story_paragraphs)


    # TODO: Iterate over each paragraph, extract full words, add `<start>` and `<end>` tokens, convert to IDs, and build sequences
    # Make sure to skip paragraphs that are too short to create any sequences
    for paragraph in paragraphs:
        full_words = extract_full_words(paragraph.lower())
        full_words.insert(0,start_token)
        full_words.append(end_token)
        if len(full_words) < max_seq_length:
            continue

        for i in range(len(full_words)-max_seq_length):
            input_seq = full_words[i:i+max_seq_length]
            target_seq = full_words[i+1:i+max_seq_length+1]

            input_seq = [word_to_id.get(word,0) for word in input_seq]
            target_seq = [word_to_id.get(word,0) for word in target_seq]
            inputs.append(input_seq)
            targets.append(target_seq)


    # TODO: Convert the inputs and targets to tensors of type `torch.long`
    inputs = torch.tensor(inputs,dtype=torch.long)
    targets = torch.tensor(targets,dtype=torch.long)
    return inputs, targets

# Generate sequences
max_seq_length = 20
inputs, targets = create_sequences(tiny_stories_text, word_to_id, max_seq_length)

print(f"Total sequences created: {len(inputs)}")
print(f"Each input sequence length: {len(inputs[0])}")
print(f"Each target sequence length: {len(targets[0])}")Problem 3l#
用刚刚实现的数据集去构造DataLoader即可
# TODO: Split into training and validation datasets (80/20 split)
train_inputs = inputs[:2000]
train_targets = targets[:2000]
val_inputs = inputs[2000:2200]
val_targets = targets[2000:2200]

print(f"Number of training sequences: {len(train_inputs)}")
print(f"Number of validation sequences: {len(val_inputs)}")

# TODO: Create TensorDatasets
train_dataset = TensorDataset(train_inputs,train_targets)
val_dataset = TensorDataset(val_inputs,val_targets)

# TODO: Create DataLoaders
batch_size = 32
train_loader = DataLoader(train_dataset,batch_size=batch_size,shuffle=True)
val_loader = DataLoader(val_dataset,batch_size=batch_size,shuffle=True)

print(f"Training batches: {len(train_loader)}")
print(f"Validation batches: {len(val_loader)}")

batch = next(iter(train_loader)) # Get the first batch from the training DataLoader

train_input, train_target = batch # Unpack the batch into input and target tensors
print(f"First 10 tokens of training input in first batch: {train_input[0][:10]}")
print(f"First 10 tokens of training target in first batch: {train_target[0][:10]}")Number of training sequences: 2000
Number of validation sequences: 200
Training batches: 63
Validation batches: 7
First 10 tokens of training input in first batch: tensor([4546, 1945, 2585, 1379, 3266, 4146, 629, 2357, 2319, 3820])
First 10 tokens of training target in first batch: tensor([1945, 2585, 1379, 3266, 4146, 629, 2357, 2319, 3820, 3896])Problem 3m#
开始训练
# Transformer training loop
def train_transformer(
    model,
    device,
    optimizer,
    criterion,
    num_epochs,
    train_dataloader,
    val_dataloader,
    vocab,
):
    # === SETUP ===
    # Move model to device
    model.to(device)

    # Lists to store metrics across epochs
    train_losses = []
    val_losses = []

    # === EPOCH LOOP ===
    for epoch in tqdm(range(num_epochs)):
        # === TRAINING PHASE ===
        model.train()  # Set model to training mode

        # Initialize metrics for this epoch
        total_train_loss = 0.0

        # === INNER LOOP (iterate over training batches) ===
        for batch_inputs, batch_targets in tqdm(train_dataloader, desc="Training"):
            # Move inputs and targets to device
            batch_inputs = batch_inputs.to(device)
            batch_targets = batch_targets.to(device)

            # Reset the gradients
            optimizer.zero_grad()

            # Forward pass
            logits = model(batch_inputs)  # [batch_size, seq_len, vocab_size]

            # Reshape for loss calculation
            loss = criterion(logits.reshape(-1, len(vocab)), batch_targets.reshape(-1))
            # Compute loss
            loss.backward()

            # Optional: Add gradient clipping to prevent exploding gradients
            torch.nn.utils.clip_grad_norm_(model.parameters(), max_norm=1.0)

            # Update the model parameters
            optimizer.step()

            # Accumulate the loss
            total_train_loss += loss.item()

        # === END OF INNER LOOP ===

        # Compute the average loss for this epoch
        avg_train_loss = total_train_loss / len(train_dataloader)
        train_losses.append(avg_train_loss)

        # === END OF TRAINING PHASE ===

        # === VALIDATION PHASE ===
        model.eval()  # Set model to evaluation mode
        total_val_loss = 0.0

        with torch.no_grad():
            # === INNER LOOP (iterate over validation batches) ===
            for batch_inputs, batch_targets in tqdm(val_dataloader, desc="Validation"):
                # Move inputs and targets to device
                batch_inputs = batch_inputs.to(device)
                batch_targets = batch_targets.to(device)

                # Forward pass
                logits = model(batch_inputs)

                # Compute loss
                loss = criterion(
                    logits.reshape(-1, len(vocab)), batch_targets.reshape(-1)
                )

                # Accumulate the loss
                total_val_loss += loss.item()
        # === END OF INNER LOOP ===

        # Compute the average loss for this epoch
        avg_val_loss = total_val_loss / len(val_dataloader)
        val_losses.append(avg_val_loss)

        # === END OF VALIDATION PHASE ===

        # Print epoch results
        print(f"\nEpoch {epoch + 1} Results:")
        print(f"  Training Loss: {avg_train_loss:.4f}")
        print(f"  Validation Loss: {avg_val_loss:.4f}")

    # === END OF EPOCH LOOP ===

return train_losses, val_losses# TODO: Instantiate a Transformer model
vocab_size=len(vocab)
transformer = Transformer(vocab_size=vocab_size,
d_model=512,
num_encoder_layers=6,
num_decoder_layers=6,
num_heads=8,
verbose=False).to(device)
# TODO: Set the optimizer
optimizer = AdamW(transformer.parameters(),lr=0.0001)
# TODO: Set the loss criterion
criterion = nn.CrossEntropyLoss()
# TODO: Set the number of epochs
num_epochs= 50
# TODO: Train the model
transformer_train_losses, transformer_val_losses = train_transformer(
model=transformer,
optimizer=optimizer,
criterion=criterion,
num_epochs=num_epochs,
train_dataloader=train_loader,
val_dataloader=val_loader,
device=device,
vocab=vocab
)Problem 3n#
和之前一样画出损失曲线
# TODO: Plot the training and validation loss across the epochs

def plot_metrics_transformer(train_losses, val_losses, num_epochs=None, title=""):
    """
    Plots the training loss, training accuracy, validation loss, and validation accuracy.
    Args:
        train_losses: list of training losses
        val_losses: list of validation losses
        train_accuracies: list of training accuracies
        val_accuracies: list of validation accuracies
        num_epochs: number of epochs
        title: title of the plot
    """
    fig, axes = plt.subplots(1, 2, figsize=(12, 8))

    # 训练损失
    axes[0].plot(train_losses, label='Training Loss')
    axes[0].set_title('Training Loss')
    axes[0].set_xlabel('Epoch')
    axes[0].set_ylabel('Loss')


    axes[1].plot(val_losses, label='Validation Loss')
    axes[1].set_title('Validation Loss')
    axes[1].set_xlabel('Epoch')
    axes[1].set_ylabel('Loss')


    plt.tight_layout()
    plt.suptitle(title)
    plt.show()

plot_metrics_transformer(train_losses=transformer_train_losses,val_losses=transformer_val_losses,
num_epochs=50,title="Transformer Training Metrics")

print(f"Final Training Loss: {transformer_train_losses[-1]:.4f}")
print(f"Final Validation Loss: {transformer_val_losses[-1]:.4f}")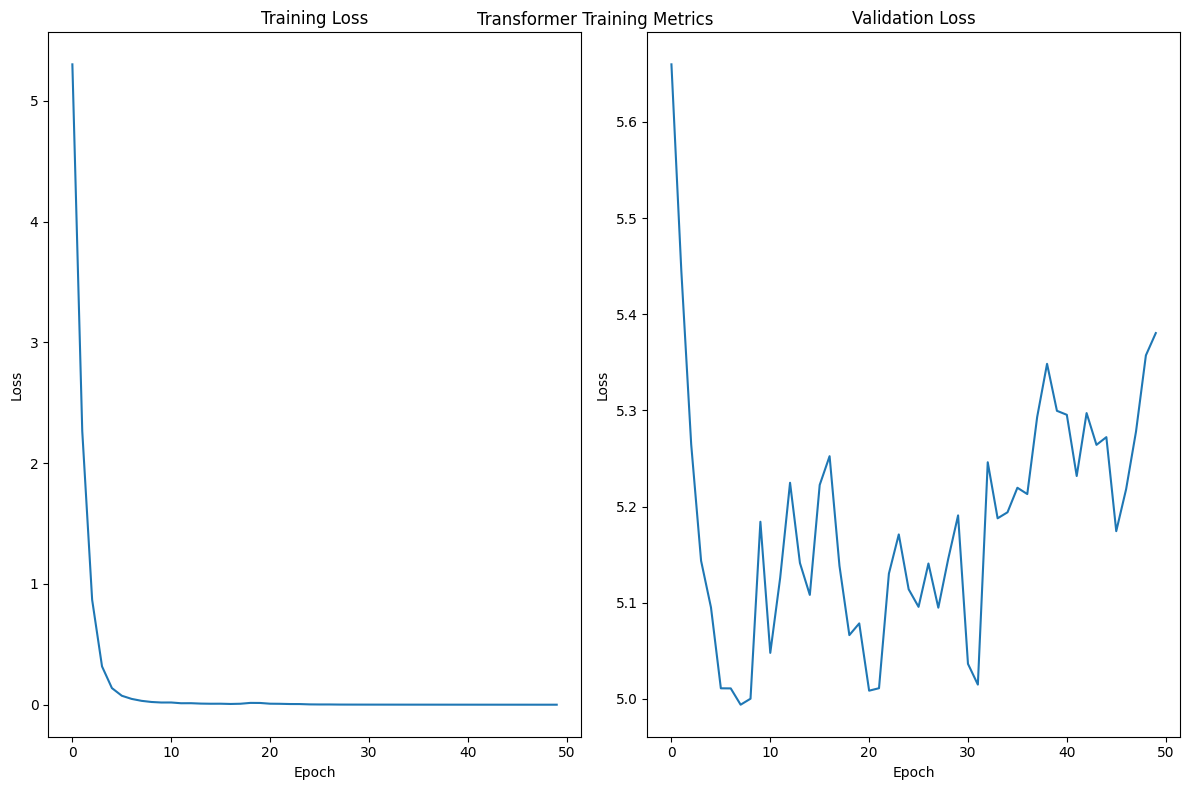
Problem 3o#
接下来就可以让我们的模型帮我们生成点东西了, 自由发挥即可
# TODO: Generate your own tiny story!
sample_text = "I love you"


sample_text = generate_sample(
    model=transformer,
    word_to_id=word_to_id,
    id_to_word=id_to_word,
    max_seq_len=20,
    prompt=sample_text,
    max_length=50
)


print(f"Sample generation: {sample_text}")Sample generation: shoes love you re lucky you re lucky you re lucky you re lucky you have a shield timmy looked at his shirt and saw that he was wearing his favorite superhero shirt he felt better and said thanks billy you re a good friend <end>