CS189 Assignment 4#
Happy Chinese New Year!
项目介绍#
本项目是Part1的延续, 利用BERT做一些任务, 同时这次的数据集是语音, 不是之前常见的数据点矩阵
BERT和Tokenizer#
什么是BERT#
Bi-Directional Encoder Representations from Transformers, 双向的Transformer Encoder, 这个模型是双向的
BERT 中的双向编码器意味着模型一次性处理整个输入序列,同时考虑每个 token 左侧和右侧的上下文。传统的语言模型是从左到右处理序列:当预测位置 的 token 时, Transformer 的解码器只能看到位置 1 到 的 token(这就是为什么我们需要在解码器的自注意力中使用掩码的原因)。与传统的只从左到右读取文本的语言模型不同, BERT 的编码器使用自注意力机制同时查看所有 token, 使其能够学习更丰富的上下文感知表示。因此,每个 token 的表示都受到序列中所有其他 token 的影响,无论这些 token 位于它之前还是之后。这对于模型理解 DNA 或文本序列的完整上下文至关重要
什么是Tokenizers#
分词器(Tokenizers)是把文本序列转化为数字序列的算法, 例如在CS336当中实现的BPE分词器就是一种
* Sentence: `"I love dinosaurs"`
* Tokens: `["[CLS]", "I", "love", "dinosaurs", "[SEP]"]`
* Token IDs: `[101, 146, 1567, 4083, 102]` (example values)可以从上面看到这个Tokenizers的目的就是把每个Token映射到一个数字, 所以分词器的预训练是非常重要的, 显然我们不希望输入的文本当中出现不存在于分词器定义域的Token, 否则模型会无法处理
在CS336中我们自己训练的BPE分词器就容易出现上面这种情况, 因为训练用的语料极其有限(至多也就几个GB的故事集), 但是在实际的任务中我们常用的是预训练好的分词器
from transformers import AutoTokenizer, AutoModel
tokenizer = AutoTokenizer.from_pretrained("<name_of_awesome_bert_model>")
model = AutoModel.from_pretrained("<name_of_awesome_bert_model>")DNABERT#
在这个lab里面用DNABERT-6, 这个模型是针对DNA序列的
Architecture#
12个Transformer Encoder layers
12个Attention Heads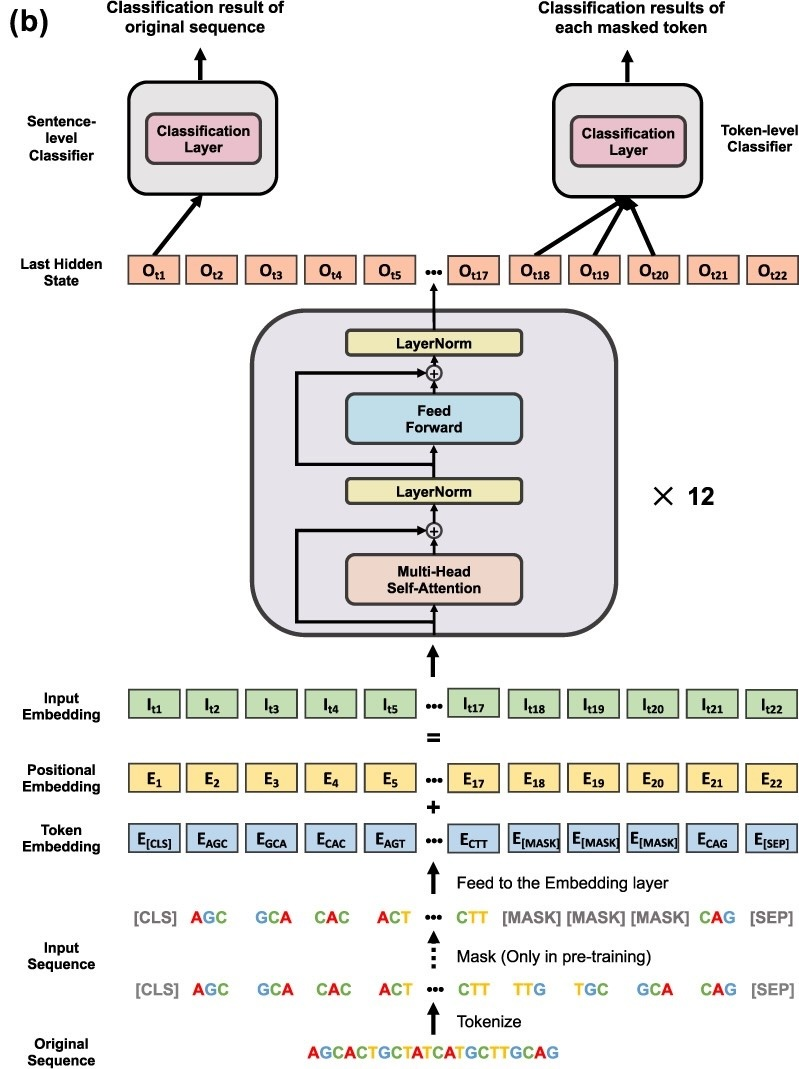
有了Part1实验当中的经历, 图上的很多模块看起来比较熟悉了, 基本上就是如下序列处理:
输入序列 -> Tokenizers分成一个个的Token -> Token Embedding层化为向量 -> Positional Encoding -> Input Embedding -> Transformer Encoder layers -> 尾部额外的层Problem 4a#
加载实验给出的DNA数据, 数据列是一个sequence, 代表DNA序列, species代表物种, 这里有大猩猩, 狗和人, 我们要手动创建一个species到target的映射, 把物种映射到整数标签
还有一个class列, 代表该DNA序列在生物学上的分类, 但在本实验中我们还是预测target而非class
set_seed() # Resets the global seed state for reproducibility

# Map of species name to class ID
species_to_target = {
    'chimpanzee': 0,
    'dog': 1,
    'human': 2
}

# Map of targets (class IDs) to species name
target_to_species = {
    target: species for species, target in species_to_target.items()
}


# TODO: Create 3 dataframes of the chimpanzee, dog, and human DNA sequences
chimpanzee_df = pd.read_table("./chimpanzee_train.txt")
dog_df = pd.read_table("./dog_train.txt")
human_df = pd.read_table("./human_train.txt")

chimpanzee_df['species']='chimpanzee'
dog_df['species']='dog'
human_df['species']='human'


# TODO: Calculate the length of the dataframe that has the smallest number of DNA sequences
num_samples_per_species = min(len(chimpanzee_df),len(dog_df),len(human_df))

# TODO: Sample `num_samples_per_species` sequences from each of the 3 dataframes and combine them into 1 dataframe
combined_df = pd.concat([chimpanzee_df.sample(n=num_samples_per_species),dog_df.sample(n=num_samples_per_species),
human_df.sample(n=num_samples_per_species)])

combined_df['target'] = combined_df['species'].map(species_to_target)

# Check that combined_df has the expected length
assert len(combined_df) == 3 * 656, f"Length of the combined dataframe is not {3 * 656}"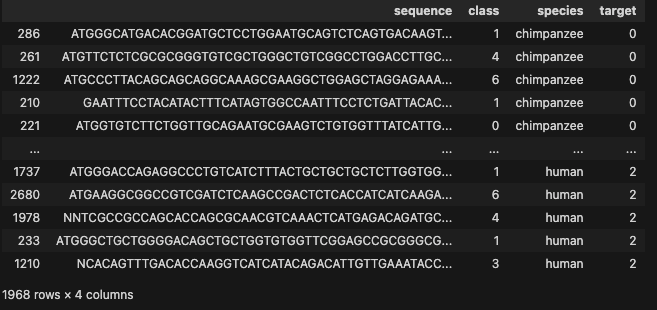
查看每个物种(总共三个物种)的第一行的DNA序列的前50个碱基对
chimpanzee_dna = combined_df[combined_df['species']=='chimpanzee'].iloc[0]['sequence']
print(f"First 50 DNA tags of chimpanzee sequence: {chimpanzee_dna[:50]}...")

dog_dna = combined_df[combined_df['species']=='dog'].iloc[0]['sequence']
print(f"First 50 DNA tags of dog sequence: {dog_dna[:50]}...")

human_dna = combined_df[combined_df['species']=='human'].iloc[0]['sequence']
print(f"First 50 DNA tags of human sequence: {human_dna[:50]}...")First 50 DNA tags of chimpanzee sequence: ATGGGCATGACACGGATGCTCCTGGAATGCAGTCTCAGTGACAAGTTGTG...
First 50 DNA tags of dog sequence: ATGGAGGTGCAGACAAAGAAAGTTCGAAAAGTTCCTCCAGGTTTGCCATC...
First 50 DNA tags of human sequence: ATGGAATCTGTGGTAAAGAACTGTGGCCAGACAGTTCATGATGAGGTGGC...这个sequence和正常的语料是不一样的, 我们需要找一个分词器来把这个sequence切成一个个的token
Problem 4b#
利用k-mers来进行切分, 这里k=6, 本质上就是个长度为k的滑动窗口
ATGCGTACTAAG
ATGCGT index 0
TGCGTA index 1
GCGTAC index 2
...看起来是一种很奇怪的切分方式, 这里的token排列组合只有4^6种, 看起来不太适合自然语言的处理
def sequence_to_kmer(sequence, k=6):
    """
    Converts a sequence into a space-separated string of k-mers.

    A k-mer is a substring of length `k` from overlapping positions in
    the input sequence. Returns all k-mers as a single string separated by spaces.

    Args:
        sequence (str): The input sequence (e.g., DNA, RNA, or text) to tokenize into k-mers.
        k (int, optional): Length of each k-mer. Defaults to 6.

    Returns:
        str: Space-separated string of k-mers.

    Example:
        >>> kmer_tokenize("ATGCGT", k=3)
        'ATG TGC GCG CGT'
    """
    # TODO: Implement the kmer_tokenize function
    result=[]
    for i in range(0,len(sequence)-k+1):
        string=sequence[i:i+k]
        result.append(string)

    return ' '.join(result)

# TODO: Apply `kmer_tokenze` to the DNA sequences and save it into a dataframe column called `kmers`
combined_df['kmers'] = combined_df['sequence'].apply(sequence_to_kmer)

# Print the first 5 rows of the dataframe
print(combined_df.sample(5, random_state=SEED))sequence class species \
622 ATGTCTTTGGTGGACTTGGGGAAGAGGTTGCTAGAAGCAGCAAGAA... 6 dog
2633 ATGGGAGGCCGCGTCTTTCTCGCATTCTGTGTCTGGCTGACTCTGC... 0 human
1101 ATGAAAGCCCACCCCAAGGAGATGGTGCCTCTCATGGGCAAGAGAG... 5 chimpanzee
294 ATGGTCAACGTCTTGAAAGGAGTGCTGATAGAATGTGACCCTGCCA... 6 dog
48 ATGGGCTGTGTGTTCTGCAAGAAGTCGGAGCCGGGGCTCAAGGACG... 1 dog
target kmers
622 1 ATGTCT TGTCTT GTCTTT TCTTTG CTTTGG TTTGGT TTGG...
2633 2 ATGGGA TGGGAG GGGAGG GGAGGC GAGGCC AGGCCG GGCC...
1101 0 ATGAAA TGAAAG GAAAGC AAAGCC AAGCCC AGCCCA GCCC...
294 1 ATGGTC TGGTCA GGTCAA GTCAAC TCAACG CAACGT AACG...
48 1 ATGGGC TGGGCT GGGCTG GGCTGT GCTGTG CTGTGT TGTG...这样就实现了切分
接下来加载一下预训练好的DNABERT-6模型和分词器
dnabert_tokenizer = AutoTokenizer.from_pretrained("zhihan1996/DNA_bert_6", trust_remote_code=True, revision="c56e67ea5827e0ddc67ef059addcf71569b1216e")
dnabert_model = AutoModel.from_pretrained("zhihan1996/DNA_bert_6", trust_remote_code=True, revision="c56e67ea5827e0ddc67ef059addcf71569b1216e")注意前面的k-mers只不过是切分成小的字符串, 我们要把它转换成数字才能送进模型, 这一步就是用Tokenizer来实现的
DNA 序列:  ATGCGTACTAAG
            ↓
生成 k-mers: ATGCGT, TGCGTA, GCGTAC, ...
            ↓
Tokenizer:  [CLS] ATG CGT TGC ... [SEP] [PAD] ...
            ↓
input_ids:  [1, 25, 30, 28, ..., 2, 0, 0, ...]
attention_mask: [1, 1, 1, 1, ..., 1, 0, 0, ...]
            ↓
DNABERT 模型
            ↓
last_hidden_state: (1, 512, 768)
            ↓
取 [CLS] 嵌入 → 用于分类或其他任务Step1: 拿出一行(做例子)k-mers之后了的数据送入Tokenizer里面
Step2: 用返回的input_ids和attention_mask送入模型, 得到last_hidden_state
last_hidden_state是一个特殊结构, 大概理解为模型的输出就好
Problem 4c#
现在模型输出的是一个(1, 512, 768)的tensor, 也就是所谓的last_hidden_state, 但我们最终想要得到的是整数, 也就是完成这个分类任务
为了得到整数分类, 一个很Trivial的想法自然是用Linear层去把768维映射成num_classes维, 但这里要注意, 每个token都被送到一个768维的向量了, 我们只需要提取第0个token, 即[CLS]对应的那个嵌入向量
文档中说这是因为[CLS]的嵌入向量是整个序列的总结, 所以我们要提取这个向量来做分类, 但我觉得这并不是一个很平凡的结论, 也许这是长期实践当中归纳出的经验吧
class DNAClassifier(nn.Module):
  def __init__(self, num_classes):
    super().__init__()
    self.backbone = AutoModel.from_pretrained("zhihan1996/DNA_bert_6", trust_remote_code=True)
    self.classifier = nn.Linear(in_features=768, out_features=num_classes)

  def forward(self, input_ids, attention_mask):
    # TODO: Pass the input_ids and attention_mask
    last_hidden_state = self.backbone(input_ids=input_ids,attention_mask=attention_mask).last_hidden_state


    # TODO: Get the embedding of the [CLS] token
    cls_embeddings = last_hidden_state[:,0,:]

    # TODO: Pass the cls_embeddings into the classifier to get class predictions
    logits = self.classifier(cls_embeddings)
    return logits

  def print_params(self):
    for name, param in self.backbone.named_parameters():
      print(f"Name: {name}\tparameter shape: {param.shape}\trequires grad: {param.requires_grad}")
    for name, param in self.classifier.named_parameters():
print(f"Name: {name}\tparameter shape: {param.shape}\trequires grad: {param.requires_grad}")注意一下这个
cls_embeddings = last_hidden_state[:,0,:]中间的0就代表第0个token
Problem 4d#
把k-mers之后数据组装成Dataset
讲一下这个__getitem__方法, 这里拿到kmers里面对应的数据之后要去进行Tokenize做映射, 原则上要返回三个元素:
'input_ids': 数字序列
'attention_mask': 掩码序列
'target': 标签前两个都是分词器返回的, 第三个是从类成员变量里拿的label, 注意分词器返回的要squeeze一下
其他没有什么难点, 跟着TODO走就好, 指导已经写的很明白了
class DNADataset(Dataset):
  def __init__(self, kmers: list[str], targets: list[int] = None, tokenizer=None, return_targets=True):
    super().__init__()
    self.kmers = kmers
    self.targets = targets
    self.return_targets = return_targets  # Whether to return targets or not
    self.tokenizer = tokenizer if tokenizer is not None else AutoTokenizer.from_pretrained("zhihan1996/DNA_bert_6", trust_remote_code=True, revision="c56e67ea5827e0ddc67ef059addcf71569b1216e")

  def __len__(self):
    # TODO: Return the number of samples in the dataset
    return len(self.kmers)

  def __getitem__(self, idx):


    # TODO: Get the k-mer at the requested index
    k_mer=self.kmers[idx]
    # TODO: If return_targets is True, get the target at the requested index and convert to torch.Tensor with dtype=torch.long
    if self.return_targets:
      target=self.targets[idx]
      target=torch.tensor(target,dtype=torch.long)

    # TODO: Tokenize the k-mer using the tokenizer. Don't forget to specify return_tensors, max_length, truncation, and padding!
    tokens=self.tokenizer(k_mer,return_tensors='pt',max_length=512,truncation=True,padding='max_length')

    # TODO: Extract and reshape the input_ids
    input_ids=tokens['input_ids'].squeeze(0)

    # TODO: Extract and reshape the attention_mask
    attention_mask=tokens['attention_mask'].squeeze(0)

    # TODO: Return a dictionary with the input_ids, attention_mask, and target (if return_targets is True)
    result = {'input_ids':input_ids,'attention_mask':attention_mask}

    if self.return_targets:
      result['target']=target

    return result
Problem 4e#
从原始数据当中切分出训练集和验证集, 并且装载进刚实现的类里面
注意在train_test_split之后要把得到的数据做to_list操作, 否则会报错, 因为刚刚写的类传入的kmers和target都是list
set_seed() # Resets the global seed state for reproducibility
# TODO: Sample 1000 DNA sequences from `combined_df`. Make sure to set the random_state!
combined_df=combined_df.sample(n=1000,random_state=SEED).reset_index()

# TODO: Use train_test_split to create training and validation splits
kmers_train,kmers_val,targets_train,targets_val=train_test_split(combined_df['kmers'],combined_df['target'],test_size=0.2,train_size=0.8,stratify=combined_df['target'],
random_state=SEED,shuffle=True)


# 在 train_test_split 之后,创建 dataset 前运行这段以规范化索引/类型

# 1) 把 kmers 转为普通 list(安全,索引语义不会影响)
kmers_train = kmers_train.tolist() if hasattr(kmers_train, "tolist") else list(kmers_train)
kmers_val   = kmers_val.tolist()   if hasattr(kmers_val, "tolist")   else list(kmers_val)

# 2) 把 targets 转为普通 list(或 numpy 数组)
targets_train = targets_train.tolist() if hasattr(targets_train, "tolist") else list(targets_train)
targets_val   = targets_val.tolist()   if hasattr(targets_val, "tolist")   else list(targets_val)

# 3) 重新创建 dataset 和 dataloader(确保 num_workers=0 便于调试)
train_set = DNADataset(kmers=kmers_train, targets=targets_train, return_targets=True)
val_set   = DNADataset(kmers=kmers_val,   targets=targets_val,   return_targets=True)

train_dataloader = DataLoader(train_set, batch_size=32, shuffle=True)
val_dataloader = DataLoader(val_set, batch_size=32, shuffle=False)Problem 4f#
实现训练循环, 无须多言, 都是公式化代码了
def train_dna_classifier(model, optimizer, criterion, device, num_epochs, train_dataloader, val_dataloader):
    """
    Args:
        model: the model to train
        optimizer: the optimizer to use
        criterion: the loss function to use
        num_epochs: the number of epochs to train for
        train_dataloader: the dataloader for the training set
        val_dataloader: the dataloader for the validation set
    Returns:
        train_losses: a list of training losses for each epoch
        val_losses: a list of validation losses for each epoch
        train_accuracies: a list of training accuracies for each epoch
        val_accuracies: a list of validation accuracies for each epoch
    """
    # === SETUP ===
    model.to(device)

    # Lists to store metrics across epochs
    train_losses = []
    val_losses = []
    train_accuracies = []
    val_accuracies = []

    # === EPOCH LOOP ===
    for epoch in range(num_epochs):
        # === TRAINING PHASE ===
        model.train() # Set model to training mode

        # Initialize metrics for this epoch
        train_loss = 0.0
        train_correct = 0

        # === INNER LOOP (iterate over training batches) ===
        for batch in train_dataloader:
            # TODO 1: Move the data and the targest to device
            input_ids = batch['input_ids'].to(device)
            attention_mask = batch['attention_mask'].to(device)
            targets = batch['target'].to(device)

            # TODO 2: Reset gradients
            optimizer.zero_grad()

            # TODO 3: Forward pass: pass inputs to model
            logits = model(input_ids=input_ids,attention_mask=attention_mask)

            # TODO 4: Compute loss
            loss = criterion(logits,targets)

            # TODO 5: Backward pass/compute gradients
            loss.backward()

            # TODO 6: Update parameters
            optimizer.step()

            # TODO 7: Track training metrics for this epoch
            train_loss+=loss.item()
            _, preds = torch.max(logits,dim=1)
            train_correct+=(preds==targets).sum().item()

        # === END OF INNER LOOP ===

        # Compute average training metrics for the epoch
        train_loss /= len(train_dataloader)
        train_acc = train_correct / len(train_dataloader.dataset)

        # Append this epoch's training metrics to history
        train_losses.append(train_loss)
        train_accuracies.append(train_acc)

        print(f"Epoch {epoch + 1}: Training loss = {train_loss}\tTraining accuracy = {train_acc}")

        # === END OF TRAINING PHASE ===

        # === VALIDATION PHASE ===
        model.eval() # set model to evaluation mode
        val_loss = 0.0
        val_correct = 0

        with torch.no_grad():
            # === INNER LOOP (iterate over validation batches) ===
            for batch in val_dataloader:
                # TODO 8: Move data to device
                input_ids = batch['input_ids'].to(device)
                attention_mask = batch['attention_mask'].to(device)
                targets = batch['target'].to(device)

                # TODO 9: Forward pass only
                logits = model(input_ids=input_ids,attention_mask=attention_mask)

                # TODO 10: Compute loss
                loss = criterion(logits,targets)

                # TODO 11: Track validation metrics
                val_loss+=loss.item()
                _, preds = torch.max(logits,dim=1)
                val_correct+=(preds==targets).sum().item()

            # === END OF INNER LOOP ===

            val_loss /= len(val_dataloader)
            val_acc = val_correct / len(val_dataloader.dataset)

        val_losses.append(val_loss)
        val_accuracies.append(val_acc)
        print(f"Epoch {epoch + 1}: Validation loss = {val_loss}\tValidation accuracy = {val_acc}")

        # === END OF VALIDATION PHASE ===

    # === END OF EPOCH LOOP ===

    # Return history
return train_losses, val_losses, train_accuracies, val_accuraciesProblem 4g#
指定模型, 优化器, 损失函数以及其他超参数, 启动训练即可
# TODO: Instantiate a DNAClassifier
dna_classifier = DNAClassifier(num_classes=3)

# TODO: Define the optimizer
optimizer = AdamW(params=dna_classifier.parameters(),lr=0.0001)

# TODO: Define the loss function
criterion = nn.CrossEntropyLoss()

# TODO: Train your DNA classifier for 5 epochs!
dna_train_losses, dna_val_losses, dna_train_accuracies, dna_val_accuracies = train_dna_classifier(
    model=dna_classifier,
    optimizer=optimizer,
    criterion=criterion,
    device=device,
    num_epochs=10,
    train_dataloader=train_dataloader,
    val_dataloader=val_dataloader
)A new version of the following files was downloaded from https://huggingface.co/zhihan1996/DNA_bert_6:
- configuration_bert.py
. Make sure to double-check they do not contain any added malicious code. To avoid downloading new versions of the code file, you can pin a revision.
A new version of the following files was downloaded from https://huggingface.co/zhihan1996/DNA_bert_6:
- dnabert_layer.py
. Make sure to double-check they do not contain any added malicious code. To avoid downloading new versions of the code file, you can pin a revision.
Epoch 1: Training loss = 1.1392503881454468 Training accuracy = 0.37875
Epoch 1: Validation loss = 1.1413285732269287 Validation accuracy = 0.355
Epoch 2: Training loss = 1.1108909916877747 Training accuracy = 0.3875
Epoch 2: Validation loss = 1.1069353307996477 Validation accuracy = 0.375
Epoch 3: Training loss = 1.0065120267868042 Training accuracy = 0.495
Epoch 3: Validation loss = 1.089234403201512 Validation accuracy = 0.45
Epoch 4: Training loss = 0.8722425246238709 Training accuracy = 0.61875
Epoch 4: Validation loss = 1.138353475502559 Validation accuracy = 0.415
Epoch 5: Training loss = 0.7556110572814941 Training accuracy = 0.67625
Epoch 5: Validation loss = 1.2105737583977836 Validation accuracy = 0.435
Epoch 6: Training loss = 0.5860666036605835 Training accuracy = 0.79125
Epoch 6: Validation loss = 1.2875271865299769 Validation accuracy = 0.45
Epoch 7: Training loss = 0.4519534611701965 Training accuracy = 0.84125
Epoch 7: Validation loss = 1.397601638521467 Validation accuracy = 0.415
Epoch 8: Training loss = 0.37866723477840425 Training accuracy = 0.87125
Epoch 8: Validation loss = 1.5645615543637956 Validation accuracy = 0.46
Epoch 9: Training loss = 0.2757827317714691 Training accuracy = 0.90625
Epoch 9: Validation loss = 1.8461172580718994 Validation accuracy = 0.42
Epoch 10: Training loss = 0.24834500044584273 Training accuracy = 0.91625
Epoch 10: Validation loss = 1.8626392909458704 Validation accuracy = 0.445Problem 4h#
画损失曲线
def plot_metrics(train_losses, val_losses, train_accuracies=None, val_accuracies=None, num_epochs=None, title=""):
    """
    Plots the training loss, training accuracy, validation loss, and validation accuracy.
    Args:
        train_losses: list of training losses
        val_losses: list of validation losses
        train_accuracies: list of training accuracies
        val_accuracies: list of validation accuracies
        num_epochs: number of epochs
        title: title of the plot
    """

    fig, axes = plt.subplots(2, 2, figsize=(12, 8))

    # 训练损失
    axes[0, 0].plot(train_losses, label='Training Loss')
    axes[0, 0].set_title('Training Loss')
    axes[0, 0].set_xlabel('Epoch')
    axes[0, 0].set_ylabel('Loss')

    axes[0, 1].plot(train_accuracies, label='Training Accuracy')
    axes[0, 1].set_title('Training Accuracy')
    axes[0, 1].set_xlabel('Epoch')
    axes[0, 1].set_ylabel('Accuracy')

    axes[1, 0].plot(val_losses, label='Validation Loss')
    axes[1, 0].set_title('Validation Loss')
    axes[1, 0].set_xlabel('Epoch')
    axes[1, 0].set_ylabel('Loss')

    axes[1, 1].plot(val_accuracies, label='Validation Accuracy')
    axes[1, 1].set_title('Validation Accuracy')
    axes[1, 1].set_xlabel('Epoch')
    axes[1, 1].set_ylabel('Accuracy')

    plt.tight_layout()
    plt.suptitle(title)
    plt.show()

# TODO: Plot your DNA classifier's loss and accuracy curves on the training data and the validation data.
# You should have 4 plots total!
plot_metrics(dna_train_losses, dna_val_losses, dna_train_accuracies, dna_val_accuracies)Problem 4i#
生成一份预测结果csv, 一键运行代码即可(只要前面的模型训练好了)
第二部分: 声音分类#
wav数据#
现在我们来处理一个更麻烦的任务, 给出一些.wav的文件, 这些声音来自不同的源, 比如说有些可能是空调的声音, 有些是狗叫, 目标是做这个分类
比较麻烦的点在于, 要先把这些.wav文件变成正常的数据格式, 这一点我们用torchaudio来实现
文件名里面有一个整数代表class_id, 这也是我们需要的label
本实验要用到交叉验证, 也就是把数据分为多个”折”(fold), 每次用n-1个折来训练, 用剩下的一个折来测试, 然后这个过程可以重复n次, 每次用一个不同的折来做测试
pythonclass_id_to_sound = { 0: "air_conditioner", 1: "car_horn", 2: "children_playing", 3: "dog_bark", 4: "drilling", 5: "engine_idling", 6: "gun_shot", 7: "jackhammer", 8: "siren", 9: "street_music" }
课程组给了一些示例代码来播放.wav文件, 因为我是服务器环境所以听不到, 如果在本地应该是可以听的, 不过记住要配好pygame环境
# audio_file = '/content/drive/MyDrive/cs189/hw/hw4/data/fold1_train/101415-3-0-2.wav'
audio_file = './data/fold1_train/101415-3-0-2.wav'
os.environ['SDL_AUDIODRIVER'] = 'dummy'
# no sound on server
if IS_COLAB:
from IPython.display import Audio, display
display(Audio(audio_file, autoplay=False))
else:
import pygame
pygame.mixer.init()
pygame.mixer.music.load(audio_file)
pygame.mixer.music.play()
while pygame.mixer.music.get_busy():
pygame.time.Clock().tick(10)频谱图#
接下来要把这个音频变成频谱图, 频谱图X轴是时间, Y轴是频率, 我们只要实例化一个torchaudio.transforms.Spectrogram就行了, 然后把这个变换应用到原始文件上去
spectrogram_transform = torchaudio.transforms.Spectrogram(n_fft=1024, normalized=True)
class_id_to_sound = {
   0: "air_conditioner",
   1: "car_horn",
   2: "children_playing",
   3: "dog_bark",
   4: "drilling",
   5: "engine_idling",
   6: "gun_shot",
   7: "jackhammer",
   8: "siren",
   9: "street_music"
}
# audio_file = '/content/drive/MyDrive/cs189/hw/hw4/data/fold1/101415-3-0-2.wav'
audio_file = './data/fold1_train/101415-3-0-2.wav'
try:
# Read WAV file
waveform, sample_rate = torchaudio.load(audio_file)
# Converts stero to mono by averaging channels. Shape becomes [1, num_samples]
waveform = waveform.mean(dim=0, keepdim=True)
# Transform the waveform into a spectrogram
spec = spectrogram_transform(waveform) # torch.Tensor of shape [1, freq_bins, time_bins]
# Print the shape of the spectrogram
print(f"Spectrogram shape: {spec.shape}") # shape [num_frequencies, num_time_bins]
# Visualize the spectrogram
plt.figure()
plt.imshow(spec.log2()[0, :, :].numpy(), aspect='auto', origin='lower') # origin = 'lower' sets input[0, 0] at bottom left
plt.title(f"Spectrogram: {audio_file.split('/')[-1]}")
plt.xlabel("Time bins")
plt.ylabel("Frequency")
plt.show()
except Exception as e:
print(f"Error processing {audio_file}: {e}")运行他给的代码可以看到频谱图
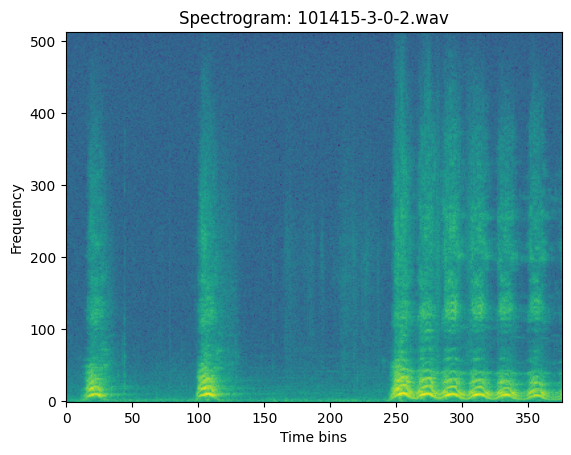
这本质上就是个二维图像了
Problem 5a#
组建Dataset, 几个要注意的点:
- 从文件名里面把正确的分类拿出来(label)返回
- 把频谱图的尺寸(1, H, W)通过
repeat变成(3, H, W) - 如果传入了额外的
transform参数, 记得在repeat之后应用
这里repeat的作用就是沿着第0维复制3次把通道数变成3, 以便于适配后面的输入
class SpectrogramDataset(Dataset):
    def __init__(self, audio_dir, transforms=None, spectrogram_transform=None, return_targets=True):
        super().__init__()
        self.audio_dir = audio_dir # Folder where the audio files will be located
        self.transforms = transforms # Additional image transforms
        self.spectrogram_transform = spectrogram_transform or torchaudio.transforms.Spectrogram(n_fft=1024, normalized=True)
        self.return_targets = return_targets  # Whether to return targets or not when __get_item__ is called
        try:
            # Get file paths of all .wav files in the provided directory
            self.file_paths = [f for f in os.listdir(audio_dir) if f.endswith('.wav')]
        except Exception as e:
            print(f"Error accessing files at {audio_dir}: {e}")
            self.file_paths = []

    def __len__(self):
        # TODO: 1. Return the number of samples in the dataset
        return len(self.file_paths)

    def __getitem__(self, index):
        # Get the file name by index
        file_name = self.file_paths[index]

        # Construct the path to the requested audio file
        filepath = os.path.join(self.audio_dir, file_name)

        # TODO: 2. Extract the target class_id from the file path if return_targets is True
        # Hint: Files are stored in the format [freesoundID]-[classID]-[occurrenceID]-[sliceID].wav
        # Don't forget to cast the class_id to dtype=torch.long for loss functions!
        if self.return_targets:
            target = int(file_name.split('-')[1])
            target = torch.tensor(target,dtype=torch.long)

        try:
            # TODO: 3. Load the audio file located at `filepath`
            waveform, sample_rate = torchaudio.load(filepath)
            # TODO: 4. Convert stereo to mono by averaging channels.
            waveform = waveform.mean(dim=0,keepdim=True)

            # TODO: 5. Generate a spectrogram of the waveform. Expected shape: (1, H, W)
            spec = self.spectrogram_transform(waveform)

            # TODO: 6. Copy the spectrogram into 3 channels to get shape: (3, H, W)
            spec = spec.repeat(3,1,1)

            # TODO: 7. Apply transformations
            if self.transforms:
                spec = self.transforms(spec)

            if self.return_targets:
                return spec, target
            else:
                return spec
        except Exception as e:
            print(f'Error processing {filepath}: {e}')
            if self.return_targets:
                return None, None
            else:
return NoneProblem 5b#
把Dataset实例化后装到DataLoader里面去
from torch.utils.data import Subset

# TODO: Define a transform to resize images to (224, 224)
resize_transform = torchvision.transforms.Resize((224,224))

# TODO: Instantiate a SpectrogramDataset using the folder fold1
spectrogram_dataset = SpectrogramDataset(audio_dir='data/fold1_train',transforms=resize_transform,return_targets=True)

# TODO: Create a 0.8 training and 0.2 test split
indices=list(range(len(spectrogram_dataset)))
train_indices,test_indices=train_test_split(
    indices,
    test_size=0.2,
    random_state=SEED,
    shuffle=True
)
spectrogram_train_dataset, spectrogram_test_dataset = Subset(spectrogram_dataset,train_indices),Subset(spectrogram_dataset,test_indices)

# TODO: Create training and testing dataloaders
spectrogram_train_dataloader = DataLoader(spectrogram_train_dataset,batch_size=32,shuffle=True)
spectrogram_test_dataloader = DataLoader(spectrogram_test_dataset,batch_size=32,shuffle=False)

# Printing out the shapes of data and targets in the first batch!
batch = next(iter(spectrogram_train_dataloader))

data, targets = batch
print(f"Shape of 1 batch of data: {data.shape}")
print(f"Shape of 1 batch of targets: {targets.shape}")公式化代码, 没什么好说的
Shape of 1 batch of data: torch.Size([32, 3, 224, 224])
Shape of 1 batch of targets: torch.Size([32])Problem 5c#
实现训练循环
def train_image_classifier(model, optimizer, criterion, device, num_epochs, train_dataloader, val_dataloader):
    """
    Args:
        model: the model to train
        optimizer: the optimizer to use
        criterion: the loss function to use
        num_epochs: the number of epochs to train for
        train_dataloader: the dataloader for the training set
        val_dataloader: the dataloader for the validation set
    Returns:
        train_losses: a list of training losses for each epoch
        val_losses: a list of validation losses for each epoch
        train_accuracies: a list of training accuracies for each epoch
        val_accuracies: a list of validation accuracies for each epoch
    """
    # === SETUP ===
    model.to(device)

    # Lists to store metrics across epochs
    train_losses = []
    val_losses = []
    train_accuracies = []
    val_accuracies = []

    # === EPOCH LOOP ===
    for epoch in range(num_epochs):
        # === TRAINING PHASE ===
        model.train() # Set model to training mode

        # Initialize metrics for this epoch
        train_loss = 0.0
        train_correct = 0

        # === INNER LOOP (iterate over training batches) ===
        for batch in train_dataloader:
            # TODO 1: Move the data and targets to device and cast them to the appropriate dtypes
            x, y = batch
            x, y = x.to(device),y.to(device)

            # TODO 2: Reset gradients
            optimizer.zero_grad()

            # TODO 3: Forward pass: pass inputs to model
            y_hat = model(x)

            # TODO 4: Compute loss
            loss = criterion(y_hat,y)

            # TODO 5: Backward pass/compute gradients
            loss.backward()

            # TODO 6: Update parameters
            optimizer.step()

            # TODO 7: Track training metrics for this epoch
            train_loss+=loss.item()
            _, preds = torch.max(y_hat,dim=1)
            train_correct+=torch.sum(preds==y).item()

        # === END OF INNER LOOP ===

        # Compute average training metrics for the epoch
        train_loss /= len(train_dataloader)
        train_acc = train_correct / len(train_dataloader.dataset)

        # Append this epoch's training metrics to history
        train_losses.append(train_loss)
        train_accuracies.append(train_acc)

        print(f"Epoch {epoch + 1}: Training loss = {train_loss}\tTrain accuracy = {train_acc}")

        # === END OF TRAINING PHASE ===

        # === VALIDATION PHASE ===
        model.eval() # set model to evaluation mode
        val_loss = 0.0
        val_correct = 0

        with torch.no_grad():
            # === INNER LOOP (iterate over validation batches) ===
            for batch in val_dataloader:
                # TODO 8: Move the data and targets to device and cast them to the appropriate dtypes
                x, y = batch
                x, y = x.to(device),y.to(device)

                # TODO 9: Forward pass only
                y_hat = model(x)

                # TODO 10: Compute loss
                loss = criterion(y_hat,y)

                # TODO 11: Track validation metrics
                val_loss+=loss.item()
                _, preds = torch.max(y_hat,dim=1)
                val_correct+=torch.sum(preds==y).item()

            # === END OF INNER LOOP ===

            val_loss /= len(val_dataloader)
            val_acc = val_correct / len(val_dataloader.dataset)

        val_losses.append(val_loss)
        val_accuracies.append(val_acc)
        print(f"Epoch {epoch + 1}: Validation loss = {val_loss}\tValidation accuracy = {val_acc}")

        # === END OF VALIDATION PHASE ===

    # === END OF EPOCH LOOP ===

    print(f"=" * 20 + " Final Metrics " + "=" * 20)
    print(f"Final training loss: {train_losses[-1]:.5f}\tFinal training accuracy = {train_accuracies[-1]:.5f}")
    print(f"Final validation loss: {val_losses[-1]:.5f}\tFinal validation accuracy = {val_accuracies[-1]:.5f}")
    print(f"=" * 55)

    # Return history
return train_losses, val_losses, train_accuracies, val_accuraciesProblem 5d#
这里用的模型是在ImageNet上预训练好的ConvNeXt模型, 他的最后一层的全连层的输出是1000维的, 我们要改成10维, 因为这是个10-分类问题
def replace_final_convnext_linear_layer(model, num_classes=10):
    # TODO: Access the classifier module of the model
    classifier = model.classifier[-1]

    # TODO: Get the input dimensions of the classifier's last linear layer
    in_features = classifier.in_features

    # TODO: replace the model's last linear layer with a new linear layer
    model.classifier[-1] = nn.Linear(in_features,num_classes)

return model预训练与微调简介#
所谓预训练就是直接用别人调好了参数的模型, 比如在ImageNet上预训练好了的resnet50
model = resnet50(weights = ResNet50_Weights.IMAGENET1K_V2)当然也可以自己初始化一版模型参数
model = resnet50(weights = None)微调有好几种方式:
-
从Scratch训练, 用随机的初始化参数
-
采用预训练好的参数, 并且冻结除了最后一个分类头之外的所有参数, 只训练最后那个Linear Layer
-
全量微调, 用预训练好的参数但是所有参数都可以再次进行训练
实验也给出了冻结某一层的参数的方式:
for name, param in frozen_backbone.named_parameters():
    if "classifier" not in name: # Freeze any non-classifier layers
param.requires_grad = False所谓”冻结”也就是是否允许参数被更改, 当然也就是设置这个梯度的bool
Problem 5e#
用全部的数据来从头训练convnext模型
# TODO: Load a ConvNeXt model with uninitialized weights
uninitialized_convnext = convnext_base(weights=None)

# TODO: Replace the final classification layer of the ConvNeXt
uninitialized_convnext = replace_final_convnext_linear_layer(model=uninitialized_convnext, num_classes=10)

# TODO: Initialize the optimizer
optimizer = AdamW(params=uninitialized_convnext.parameters(),lr=1e-4)

# TODO: Define the loss function
criterion = nn.CrossEntropyLoss()

# TODO: Train your model for 5 epochs
unintialized_train_losses, unintialized_val_losses, unintialized_train_accuracies, unintialized_val_accuracies = train_image_classifier(
    model=uninitialized_convnext,
    train_dataloader=spectrogram_train_dataloader,
    val_dataloader=spectrogram_test_dataloader,
    optimizer=optimizer,
    num_epochs=5,
    criterion=criterion,
    device=device)

# TODO: Plot the metrics
plot_metrics(unintialized_train_losses, unintialized_val_losses, unintialized_train_accuracies, unintialized_val_accuracies)Epoch 1: Training loss = 2.3848066329956055 Train accuracy = 0.1774193548387097
Epoch 1: Validation loss = 2.237703227996826 Validation accuracy = 0.20714285714285716
Epoch 2: Training loss = 2.1374161640803018 Train accuracy = 0.21505376344086022
Epoch 2: Validation loss = 2.2762171745300295 Validation accuracy = 0.2357142857142857
Epoch 3: Training loss = 2.1253870791859097 Train accuracy = 0.23297491039426524
Epoch 3: Validation loss = 2.116562104225159 Validation accuracy = 0.2
Epoch 4: Training loss = 2.0567029780811734 Train accuracy = 0.2078853046594982
Epoch 4: Validation loss = 2.0853104829788207 Validation accuracy = 0.19285714285714287
Epoch 5: Training loss = 2.0093974073727927 Train accuracy = 0.22580645161290322
Epoch 5: Validation loss = 2.036539649963379 Validation accuracy = 0.2642857142857143
==================== Final Metrics ====================
Final training loss: 2.00940 Final training accuracy = 0.22581
Final validation loss: 2.03654 Final validation accuracy = 0.26429
=======================================================注意这里的学习率是超参数, 可以调的
Problem 5f#
冻结除了分类头以外的层, 只训练分类头
# TODO: Load a ConvNeXt model with pretrained weights
frozen_backbone = convnext_base(weights=ConvNeXt_Base_Weights.IMAGENET1K_V1)

# TODO: Replace the final classification layer of the ConvNeXt
frozen_backbone = replace_final_convnext_linear_layer(model=frozen_backbone, num_classes=10)

# TODO: Freeze the ConvNeXt's backbone
for name,param in frozen_backbone.named_parameters():
    if "classifier" not in name:
        param.requires_grad = False

    else:
        param.requires_grad=True

# TODO: Initialize the optimizer
optimizer = AdamW(params=frozen_backbone.parameters(),lr=1e-4)

# TODO: Define the loss function
criterion = nn.CrossEntropyLoss()

# TODO: Train your model for 5 epochs
frozen_bb_train_losses, frozen_bb_val_losses, frozen_bb_train_accuracies, frozen_bb_val_accuracies = train_image_classifier(
    model=frozen_backbone,
    train_dataloader=spectrogram_train_dataloader,
    val_dataloader=spectrogram_test_dataloader,
    optimizer=optimizer,
    criterion=criterion,
    num_epochs=5,
    device=device)

# TODO: Plot the metrics
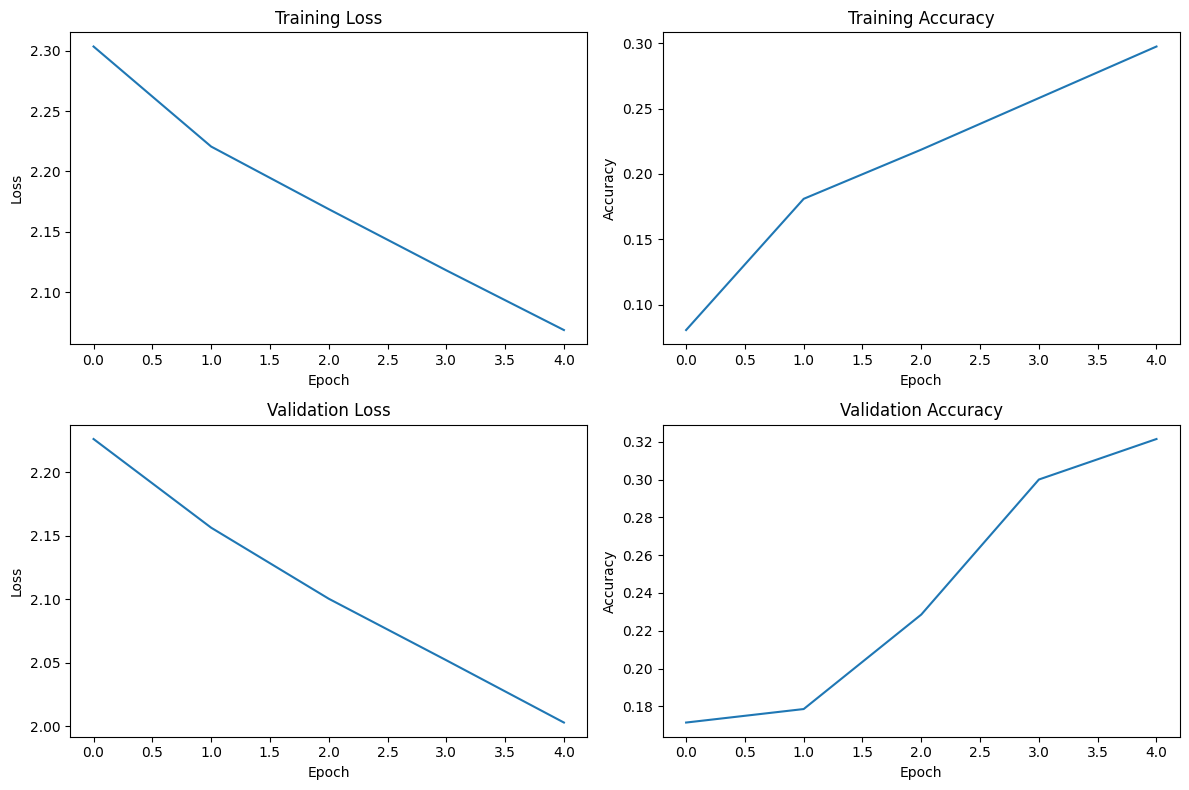
plot_metrics(frozen_bb_train_losses, frozen_bb_val_losses, frozen_bb_train_accuracies, frozen_bb_val_accuracies)Epoch 1: Training loss = 2.303494784567091 Train accuracy = 0.08064516129032258
Epoch 1: Validation loss = 2.2263582229614256 Validation accuracy = 0.17142857142857143
Epoch 2: Training loss = 2.220644950866699 Train accuracy = 0.18100358422939067
Epoch 2: Validation loss = 2.1564966201782227 Validation accuracy = 0.17857142857142858
Epoch 3: Training loss = 2.168804738256666 Train accuracy = 0.21863799283154123
Epoch 3: Validation loss = 2.100537633895874 Validation accuracy = 0.22857142857142856
Epoch 4: Training loss = 2.118125465181139 Train accuracy = 0.25806451612903225
Epoch 4: Validation loss = 2.0520622968673705 Validation accuracy = 0.3
Epoch 5: Training loss = 2.068689114517636 Train accuracy = 0.2974910394265233
Epoch 5: Validation loss = 2.0029944658279417 Validation accuracy = 0.32142857142857145
==================== Final Metrics ====================
Final training loss: 2.06869 Final training accuracy = 0.29749
Final validation loss: 2.00299 Final validation accuracy = 0.32143
=======================================================
Problem 5g#
全量微调
# TODO: Load a ConvNeXt model with pretrained weights
unfrozen_convnext = convnext_base(weights=ConvNeXt_Base_Weights.IMAGENET1K_V1)

# TODO: Replace the final classification layer of the ConvNeXt
unfrozen_convnext = replace_final_convnext_linear_layer(model=unfrozen_convnext, num_classes=10)

# TODO: Make sure all the parameters are trainable
for param in unfrozen_convnext.parameters():
    param.requires_grad = True

# TODO: Initialize the optimizer
optimizer = AdamW(params=unfrozen_convnext.parameters(),lr=1e-4)

# TODO: Define the loss function
criterion = nn.CrossEntropyLoss()

# TODO: Train your model for 5 epochs
unfrozen_train_losses, unfrozen_val_losses, unfrozen_train_accuracies, unfrozen_val_accuracies = train_image_classifier(
    model=unfrozen_convnext,
    train_dataloader=spectrogram_train_dataloader,
    val_dataloader=spectrogram_test_dataloader,
    optimizer=optimizer,
    num_epochs=5,
    criterion=criterion,
    device=device)

# TODO: Plot the metrics
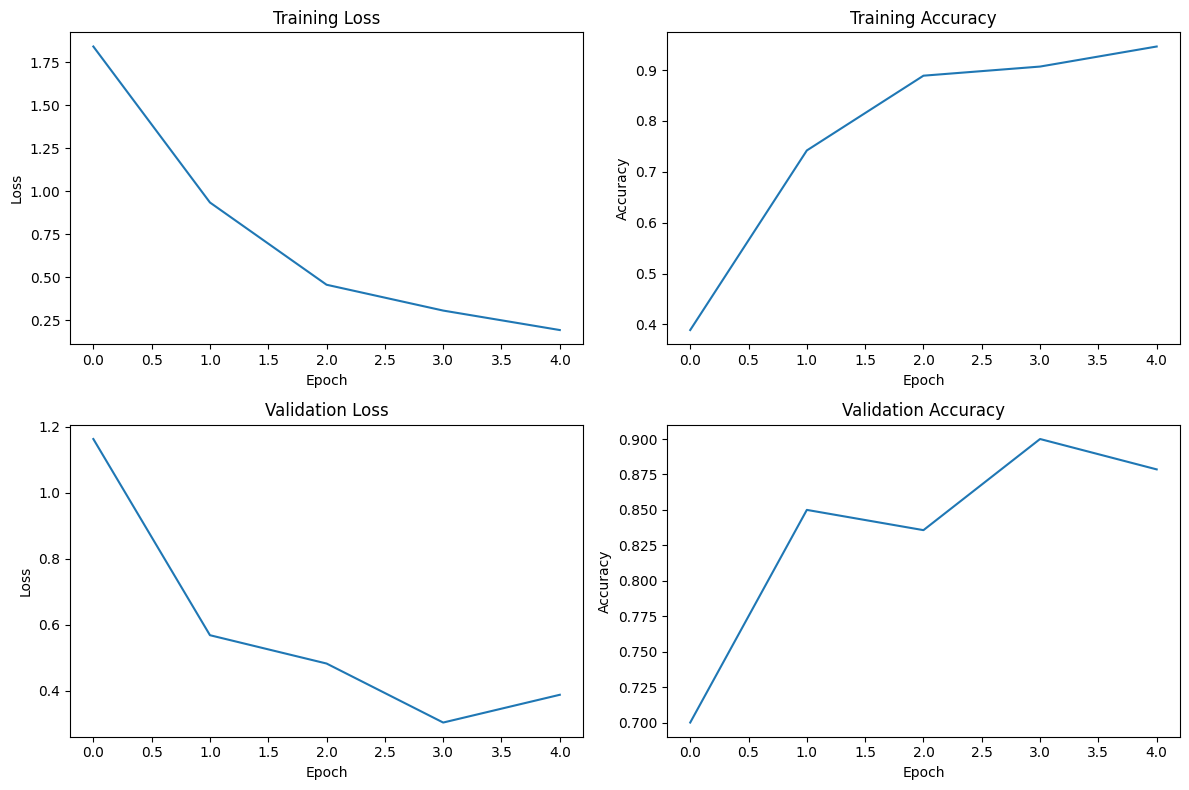
plot_metrics(unfrozen_train_losses, unfrozen_val_losses, unfrozen_train_accuracies, unfrozen_val_accuracies)Epoch 1: Training loss = 1.8407021694713168 Train accuracy = 0.3888888888888889
Epoch 1: Validation loss = 1.1633551120758057 Validation accuracy = 0.7
Epoch 2: Training loss = 0.9334362381034427 Train accuracy = 0.7419354838709677
Epoch 2: Validation loss = 0.5684262037277221 Validation accuracy = 0.85
Epoch 3: Training loss = 0.4550878521468904 Train accuracy = 0.8888888888888888
Epoch 3: Validation loss = 0.4825403094291687 Validation accuracy = 0.8357142857142857
Epoch 4: Training loss = 0.3048595061732663 Train accuracy = 0.9068100358422939
Epoch 4: Validation loss = 0.3036103412508965 Validation accuracy = 0.9
Epoch 5: Training loss = 0.19161400902602407 Train accuracy = 0.946236559139785
Epoch 5: Validation loss = 0.3878093510866165 Validation accuracy = 0.8785714285714286
==================== Final Metrics ====================
Final training loss: 0.19161 Final training accuracy = 0.94624
Final validation loss: 0.38781 Final validation accuracy = 0.87857
=======================================================
Problem 5h#
分析一下上面三种方式(从Scratch训练, 冻结除了分类头以外的层, 全量微调)的绩效
Pretrained + Full Fine-tuning is the most effective approach because it allows the model to adapt to the new dataset and achieve the highest accuracy.

Disadvantages:
* It requires more data and training time.
* It may overfit to the new dataset if the amount of data is limited.Problem 5i#
推理一次, 看看预测的效果
# TODO 1: Pick an audio file to listen to and save it to the `audio_file` variable
# audio_file = '/content/drive/MyDrive/cs189/hw/hw4/data/fold1_train/101415-3-0-2.wav'
audio_file = 'data/fold1_train/101415-3-0-2.wav'
if IS_COLAB:
    from IPython.display import Audio, display
    display(Audio(audio_file, autoplay=False))
else:
    import pygame
    pygame.mixer.init()
    pygame.mixer.music.load(audio_file)
    pygame.mixer.music.play()
    while pygame.mixer.music.get_busy():
        pygame.time.Clock().tick(10)

try:
    # TODO 2: Load the .wav audio file
    waveform, sample_rate = torchaudio.load(audio_file)

    # TODO 3: Average the channels to create a single mono channel
    waveform = waveform.mean(dim=0, keepdim=True)

    # TODO 4: Generate a spectrogram
    spec = spectrogram_transform(waveform)

    # TODO 5: Resize the spectrogram into the shape (1 x 224 x 224)
    spec = resize_transform(spec)

    # TODO 6: Repeat the spectrogram 3 times to have 3 channels
    spec = spec.repeat(3,1,1)

    # TODO 7: Add a batch dimension
    spec = spec.unsqueeze(0)

    # TODO 8: Move the input to the right device and cast it to the right dtype
    spec = spec.to(device)
    spec = spec.float()

    # TODO 9: Get the model's outputs
    y_hat = unfrozen_convnext(spec)

    # TODO 10: find the class with the highest output score
    _, pred = torch.max(y_hat,dim=1)

    # TODO 11: Look up the class label of the model's prediction
    predicted_class = class_id_to_sound[pred.item()]

    # TODO 12: Parse the audio file's name to get the true class ID and the true class label
    true_class_id = os.path.basename(audio_file).split('-')[1]
    true_class = class_id_to_sound[int(true_class_id)]

    print(f"Predicted class: {predicted_class}")
    print(f"True class: {true_class}")
except Exception as e:
    print(f'Error processing {audio_file}: {e}')
Predicted class: dog_bark
True class: dog_bark